Gluten Window Test
A hands-on technique for checking gluten development by stretching a small piece of dough thin enough to see light through it without tearing.
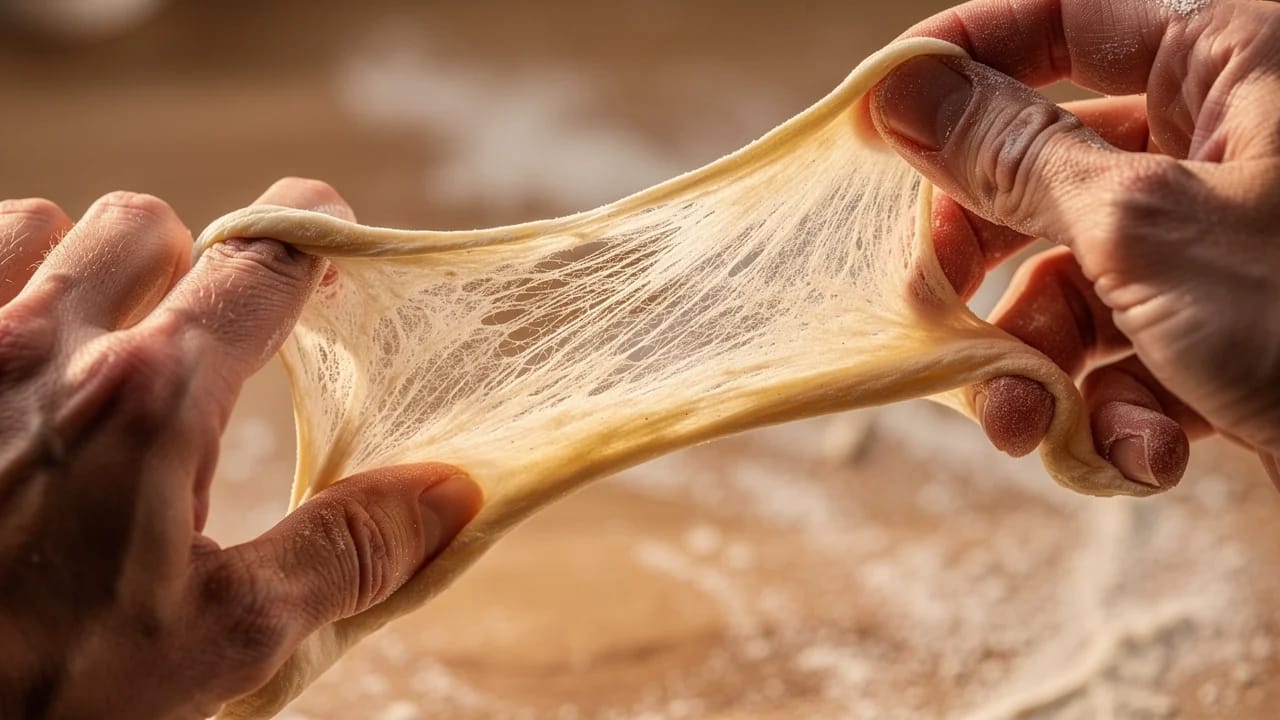
The gluten window test (also called the windowpane test) is the most reliable way to check whether your dough has developed enough gluten before moving on to bulk fermentation. You take a small piece of dough, stretch it between your fingers, and see if it forms a thin, translucent membrane — like a frosted window — without ripping. If it does, the gluten network is strong enough to trap gas and give your bread structure. If it tears, the dough needs more work.
Every baker should know this test. It takes ten seconds and removes the guesswork from kneading.
Why the gluten window test matters
Bread dough needs a strong, elastic gluten network to hold the carbon dioxide that yeast produces during fermentation. Without sufficient gluten development, the gas escapes, and you end up with a dense, flat loaf with a tight crumb.
The problem is that kneading times in recipes are estimates. Your flour, your water, your room temperature, and your kneading technique all affect how fast gluten develops. A recipe that says "knead for 10 minutes" might need 7 minutes with strong bread flour and 14 minutes with a weaker all-purpose. The window test tells you what is actually happening inside the dough, regardless of how long you have been working it.
How to perform the test
Step by step
- Pinch off a piece of dough about the size of a golf ball (roughly 40-50 g). Take it from the center of the mass, not the dry edge.
- Let it rest in your hands for 10-15 seconds. Dough that has just been stretched or kneaded is tense. Giving it a brief rest makes it more cooperative. Roll it lightly into a ball between your palms.
- Hold the ball between your thumbs and index fingers of both hands, with your fingers on top and thumbs underneath. Start with your hands close together, about 3-4 cm apart.
- Stretch slowly and evenly. Pull your hands apart while simultaneously pressing outward with your thumbs. Rotate the dough a quarter turn every few stretches so you thin it in all directions. Do not rush — jerky, fast pulls will tear even well-developed dough.
- Look through it. Hold the stretched dough up toward a light source. You are looking for a thin, even membrane that lets light pass through without tearing.
Reading the results
| What you see | What it means | What to do |
|---|---|---|
| Dough stretches into a thin, translucent sheet — you can see the shadow of your fingers through it | Gluten is fully developed | Move on to bulk fermentation |
| Dough stretches somewhat but tears before becoming translucent, with ragged edges at the tear | Gluten is partially developed | Knead for 3-5 more minutes and test again |
| Dough tears almost immediately with a rough, crumbly break | Gluten is underdeveloped | Continue kneading; the dough needs significant more work |
| Dough is extremely elastic and snaps back without stretching thin | Dough is overworked or needs rest | Let the dough rest covered for 15-20 minutes, then test again |
A properly developed dough stretches into a membrane about 1-2 mm thick that is slightly opaque — not crystal clear like plastic wrap, but thin enough that you can see diffused light or the outline of your fingers behind it. The edges of the stretched area should be smooth, not jagged.
When to use the window test
After kneading
The most common time. Whether you knead by hand (10-15 minutes) or with a stand mixer (6-10 minutes on medium speed), test before you stop. This is especially important when you are learning — after a dozen bakes, you will start to recognize the feel of developed dough without needing to test every time.
After autolyse
If your recipe includes an autolyse step (resting flour and water together before adding salt and starter), do a window test before and after. You will be surprised how much gluten develops during a 30-60 minute autolyse with zero kneading. This tells you how much mechanical work the dough still needs.
During bulk fermentation
Stretch and folds during bulk fermentation continue to build gluten. If you are making a no-knead or minimal-knead bread, test after your second or third set of folds. By that point, the dough should pass the window test even if it failed right after mixing.
Before shaping
Some bakers test just before shaping to confirm the gluten has not degraded from over-fermentation. If the dough that passed the test after kneading now tears easily, bulk has gone too long and the acids have weakened the gluten network.
Limitations
The gluten window test is not universal. It works best on lean doughs made with white bread flour at moderate hydration (60-70%). Several situations make it unreliable:
Whole grain and high-extraction flours. The bran particles in whole wheat, rye, and spelt flours act like tiny blades that cut through the gluten strands as you stretch. A whole wheat dough can be perfectly well-developed and still tear during the window test. For doughs with more than 30% whole grain flour, rely on feel instead — the dough should be smooth, slightly tacky, and spring back when poked.
Very high hydration doughs (78%+). Wet doughs are sticky and difficult to handle for the test. They tend to cling to your fingers and tear from their own weight rather than from poor gluten development. With high-hydration doughs, judge development by how the dough responds to folds — after 3-4 sets, it should hold its shape on the counter and feel cohesive rather than soupy.
Enriched doughs. Brioche, challah, and other doughs with significant butter, eggs, or sugar develop gluten differently. Fat coats the gluten strands and makes the dough softer. You can still do the test, but the membrane will feel different — more like stretching warm mozzarella than pulling a sheet of elastic.
Rye doughs. Rye flour produces very little gluten. A rye dough will never pass the window test, even at 100% development. Rye breads rely on pentosans (a different type of carbohydrate) for structure, not gluten.
Common mistakes
Stretching too fast. This is the most common error. A quick pull will tear any dough, developed or not. Slow, even pressure is the key. Think of it as coaxing the dough open, not ripping it apart.
Testing dough that is too cold. Cold dough straight from the fridge is stiff and will tear even with strong gluten. Let it warm to room temperature (20-22°C / 68-72°F) before testing.
Using too much flour on your hands. A light dusting is fine, but caking your hands in flour dries out the dough sample and makes it tear prematurely. Slightly damp hands often work better.
Testing right after mixing salt. Salt tightens gluten dramatically. If you just added salt and gave two minutes of kneading, the dough will feel stiff and may tear. Give it 5 minutes of kneading after salt incorporation before testing.
Expecting perfection from every dough. Not every bread needs a perfect windowpane. Rustic loaves, ciabatta, and many sourdoughs get their final gluten development through folds during bulk rather than upfront kneading. If you are making a bread that relies on fold-based development, a partial window after mixing is fine.
Tips for better results
Use bread flour for practice. Bread flour (12-14% protein) gives the most dramatic and easy-to-read windowpane. Once you can reliably get a good window with bread flour, you will know what to look for with other flours.
Oil your hands instead of flouring them. A thin film of olive oil prevents sticking without drying the dough surface. The test is easier and more accurate.
Test in front of a window or lamp. Backlighting makes the membrane much easier to evaluate. Hold it up so the light passes through it directly.
If you are new to bread making, the bread baking for beginners guide covers the gluten window test alongside other fundamental techniques.
Gluten window test in Fond
Fond's Bread Studio includes a kneading timer with a built-in reminder to perform the gluten window test. When you start a bread recipe, the app prompts you at the expected development point based on your flour type and method, so you never forget to check before moving on to bulk fermentation.

Cook smarter
Join the waitlist for Fond. Recipes, meal plans, and a little AI sous-chef that learns how you cook.
Related terms
Autolyse
A bread-making technique where flour and water are mixed and rested before adding salt and leavening, allowing gluten to develop naturally.

Bulk Fermentation
The primary rise of bread dough after mixing, where yeast or starter ferments the dough as a single mass before shaping.

Gluten Development
The process of building a protein network in dough through kneading, folding, or time, creating the structure that gives bread its chew and allows it to rise.
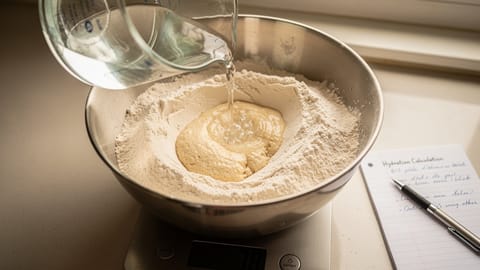
Hydration (Bread)
The ratio of water to flour in bread dough, expressed as a percentage. Higher hydration means wetter, more open-crumb bread.

Bread baking for beginners: your first loaf, start to finish
A complete walkthrough for baking your first loaf of bread at home. Covers the four core ingredients, kneading by hand or mixer, proofing, shaping, and baking, with temperatures, times, and troubleshooting for every step.