Gluten Window Test
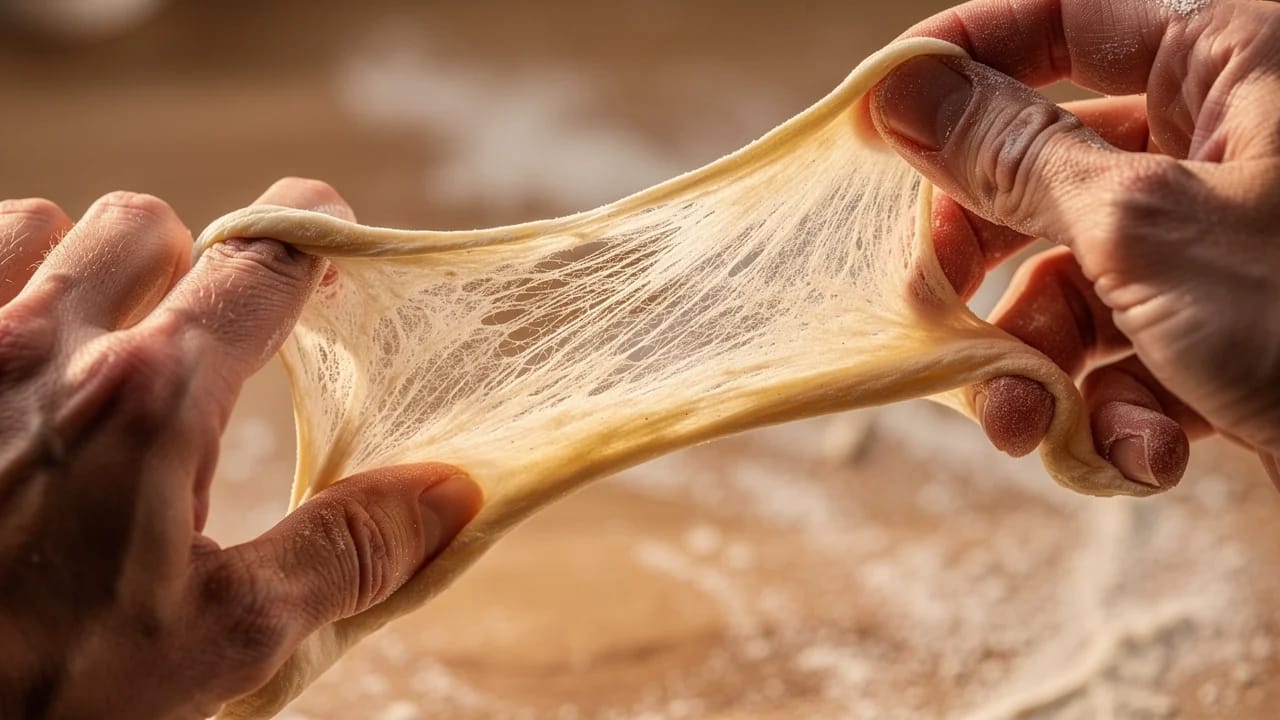
The gluten window test (or windowpane test) is a hands-on technique for checking gluten development — stretch a small piece of dough thin enough to see light through it without tearing, the dough is ready.
The windowpane test (also called the gluten window test) is the most reliable way to check whether your dough has developed enough gluten before moving on to bulk fermentation. You take a small piece of dough, stretch it between your fingers, and see if it forms a thin, translucent membrane without ripping. If it does, the gluten network is strong enough to trap gas and give your bread structure. If it tears, the dough needs more work.
Every baker should know this test. It takes ten seconds and removes the guesswork from kneading. I used to rely on timer-based kneading ("10 minutes should be enough"), and my results were wildly inconsistent until I started testing the dough itself.
Why does the windowpane test matter?
Bread dough needs a strong, elastic gluten network to hold the carbon dioxide that yeast produces during fermentation. Without sufficient gluten development, the gas escapes, and you end up with a dense, flat loaf with a tight crumb.
The problem is that kneading times in recipes are estimates. Your flour, your water, your room temperature, and your kneading technique all affect how fast gluten develops. A recipe that says "knead for 10 minutes" might need 7 minutes with strong bread flour and 14 minutes with a weaker all-purpose. The windowpane test tells you what's actually happening inside the dough, regardless of how long you've been working it.
How do you perform the windowpane test?
Reading the results
Gluten is fully developed. Move on to bulk fermentation.
Gluten is partially developed. Knead for 3-5 more minutes and test again.
Gluten is underdeveloped. Continue kneading — the dough needs significant more work.
Dough is overworked or needs rest. Cover it and let it relax for 15-20 minutes, then test again.
A properly developed dough stretches into a membrane about 1-2 mm thick that is slightly opaque. Not crystal clear like plastic wrap, but thin enough to see diffused light or the outline of your fingers behind it. The edges of the stretched area should be smooth, not jagged.
When should you use the windowpane test?
After kneading is the most common time. Whether you knead by hand or with a stand mixer, test before you stop. This is especially important when you're learning. After a dozen bakes, you'll start to recognize the feel of developed dough without needing to test every time.
After autolyse, do a window test before and after the rest. You'll be surprised how much gluten develops during a 30-60 minute autolyse with zero kneading. This tells you how much mechanical work the dough still needs.
During bulk fermentation, stretch and folds continue to build gluten. If you're making a no-knead or minimal-knead bread, test after your second or third set of folds. By that point, the dough should pass the windowpane test even if it failed right after mixing.
Before shaping, some bakers test to confirm the gluten hasn't degraded from over-fermentation. If the dough that passed the test after kneading now tears easily, bulk has gone too long and the acids have weakened the gluten network.
What are the limitations of the windowpane test?
The windowpane test works best on lean doughs made with white bread flour at moderate hydration (60-70%). Several situations make it unreliable:
Whole grain and high-extraction flours. The bran particles in whole wheat, rye, and spelt flours act like tiny blades that cut through gluten strands as you stretch. A whole wheat dough can be perfectly well-developed and still tear during the test. For doughs with more than 30% whole grain flour, rely on feel instead — the dough should be smooth, slightly tacky, and spring back when poked.
Very high hydration doughs (78%+). Wet doughs are sticky and cling to your fingers. They tend to tear from their own weight rather than from poor gluten development. With high-hydration doughs, judge development by how the dough responds to folds. After 3-4 sets, it should hold its shape on the counter and feel cohesive rather than soupy.
Enriched doughs. Brioche, challah, and other doughs with significant butter, eggs, or sugar develop gluten differently. Fat coats the gluten strands and makes the dough softer. You can still do the test, but the membrane will feel different — more like stretching warm mozzarella than pulling a sheet of elastic.
Rye doughs. Rye flour produces very little gluten. A rye dough will never pass the windowpane test, even at maximum development. Rye breads rely on pentosans (a different type of carbohydrate) for structure, not gluten.
What are the most common windowpane test mistakes?
After dozens of sourdough bakes, I've stopped stressing about a perfect windowpane after initial mixing. My best loaves often show a partial window after mixing and reach full development through three sets of stretch and folds during bulk fermentation. The test is a snapshot, not a verdict.
Windowpane test vs. poke test
The windowpane test and the poke test measure different things. The windowpane checks gluten development (structural readiness). The poke test checks proofing level (fermentation progress) — you press a floured finger into the dough and watch how quickly it springs back. Use the windowpane test early (after kneading or folds) and the poke test late (before baking).
If you're new to bread making, the bread baking for beginners guide covers both tests alongside other fundamental techniques.
Windowpane test in Fond
Fond's Bread Studio includes a kneading timer with a built-in reminder to perform the windowpane test. When you start a bread recipe, the app prompts you at the expected development point based on your flour type and method, so you never forget to check before moving on to bulk fermentation.