Detroit-Style Pizza Dough
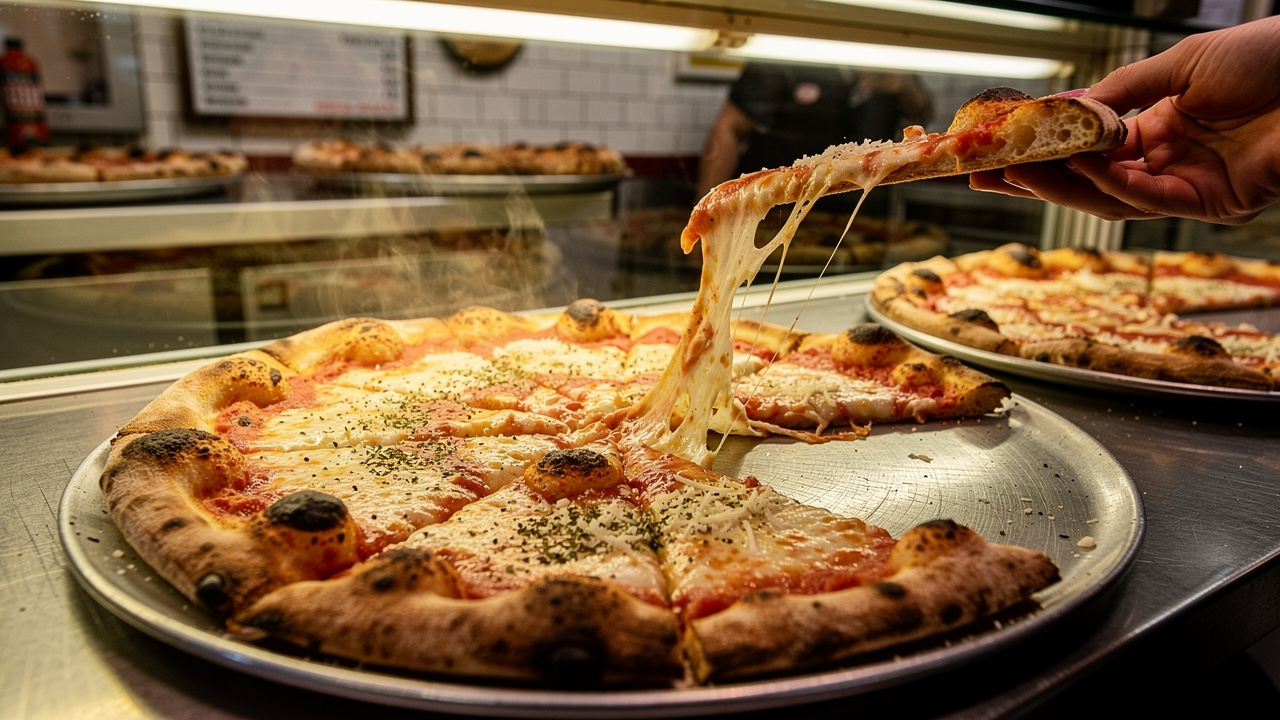
Rectangular pan pizza with a shatteringly crispy caramelized cheese edge and an open, focaccia-like crumb. 70% hydration dough, Wisconsin brick cheese, and cold sauce stripes applied after baking.
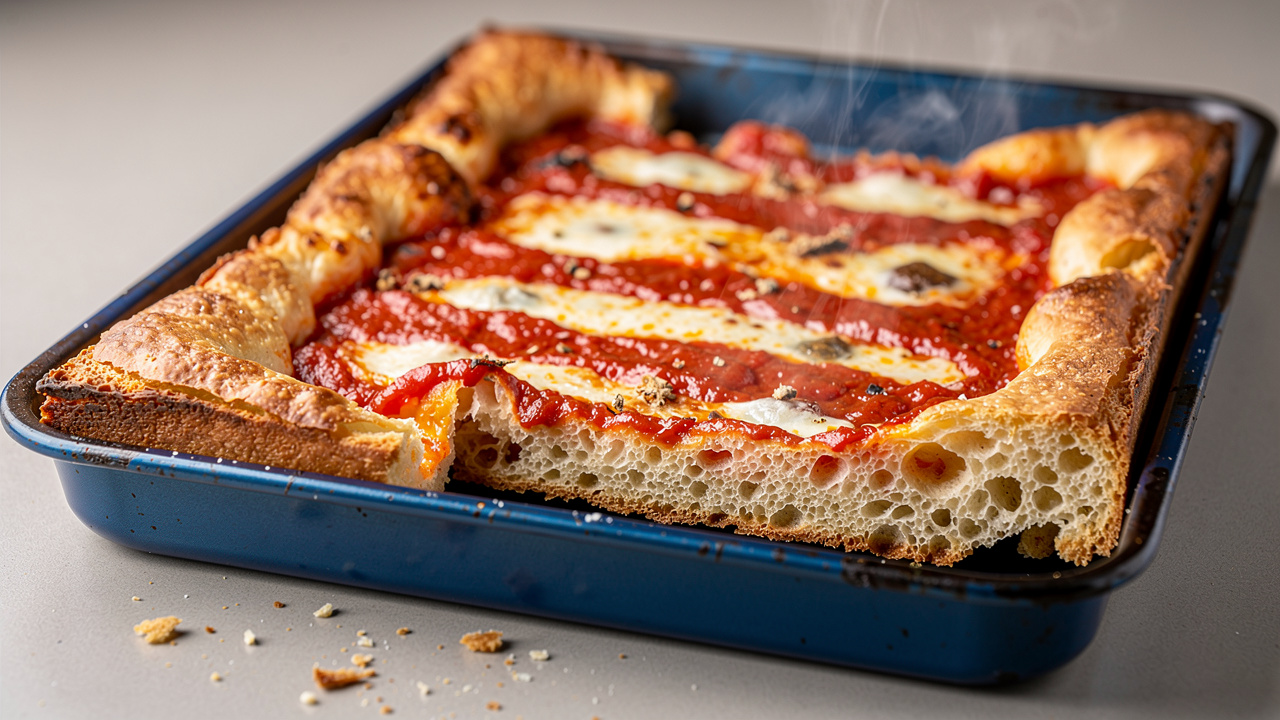
TL;DR: Detroit-style pizza dough is a 70% hydration recipe, cold-fermented 24–48 hours and baked at 500–550°F in a blue steel pan. Wisconsin brick cheese is cubed and pressed to the edges — creating a caramelized frico crust — and cold sauce "racing stripes" go on after baking. The two-phase bake (5–6 min prebake, then 10–12 min with cheese) is the key technique.
What is Detroit-style pizza dough?
Detroit-style pizza is a rectangular pan pizza born in 1946 at Buddy's Rendezvous Pizzeria in Detroit, Michigan. Gus Guerra created it, drawing on his wife's Sicilian family recipe — but what made it distinctly Detroit was the pan. The originals were blue steel utility trays from Detroit's auto factories, repurposed from the assembly lines of the Big Three. Those heavy industrial trays conducted heat evenly and gave the pizza its rectangular shape and crispy, caramelized bottom.
For decades it stayed local — beloved in the Motor City, unknown everywhere else. The national breakout came in the 2010s. Shawn Randazzo, a Detroit native, won the World Pizza Championship in the Detroit-style category at the International Pizza Expo in 2012, and spent years refining and evangelizing the technique before his death in 2020. You can now find Detroit-style shops worldwide, but the fundamentals haven't changed since Buddy's kitchen.
Three things define the style: a thick, airy crust with a shatteringly crispy caramelized cheese edge, Wisconsin brick cheese (plus white Cheddar) spread all the way to the pan walls, and "racing stripes" — three thick stripes of cold sauce laid lengthwise after baking. The high-hydration dough and heavy steel pan work together to produce a crumb that's open and airy inside, fried and crispy on the bottom.
How Detroit differs from Sicilian and grandma-style
All three are thick rectangular pan pizzas, but the differences matter:
| Detroit | Sicilian | Grandma | |
|---|---|---|---|
| Dough hydration | 70% | 60–65% | 65–70% |
| Cheese | Brick + Cheddar, to the edges | Low-moisture mozz | Low-moisture mozz |
| Assembly order | Cheese first, then sauce after baking | Sauce, then cheese | Sauce, then cheese |
| Pan | Blue steel, oiled with butter + olive oil | Sheet pan, olive oil | Sheet pan, lots of olive oil |
| Crust edge | Frico (caramelized cheese) | Plain or oiled | Plain or oiled |
| Bake temp | 500–550°F | 450–500°F | 450–475°F |
The pan makes the difference
The pan matters more than almost anything else. Traditional blue steel pans (8×10 or 10×14 inches) work best because they:
- Conduct heat aggressively — giving you that crispy, almost fried bottom
- Build a seasoned surface over time, like cast iron
- Let cheese caramelize directly against the hot metal walls
- Hold the rectangular shape with vertical sides that the cheese can climb
Best pan options by budget:
- Traditional: Blue steel pans from Detroit-Style Pizza Co. or similar — the real thing, requires seasoning
- Commercial-grade: LloydPans Detroit-style aluminum pans — no seasoning required, faster bake
- Accessible substitute: Dark anodized 9×13-inch metal pan — works well, widely available
- Avoid: Non-stick, glass, or light-colored aluminum — won't get you a proper frico crust
Greasing the pan: butter + olive oil
Use both butter and olive oil — not one or the other. Butter adds flavor and promotes browning; olive oil has a higher smoke point and keeps the butter from burning at 500°F. About 1 tablespoon of each for a standard 10×14 pan. Melt the butter, mix with olive oil, coat the bottom and sides thoroughly. When the cold dough hits the greased pan, you should hear a faint sizzle — that means there's enough fat. If it's silent, add more.
This dual-fat approach essentially fries the bottom of the dough during baking — that's where the golden, crunchy base comes from.
Seasoning and maintaining steel pans
Season black steel the same way you'd season cast iron:
Never use soap on a seasoned pan. Over time, your pan develops a dark, naturally non-stick patina that improves every bake.
Ingredients
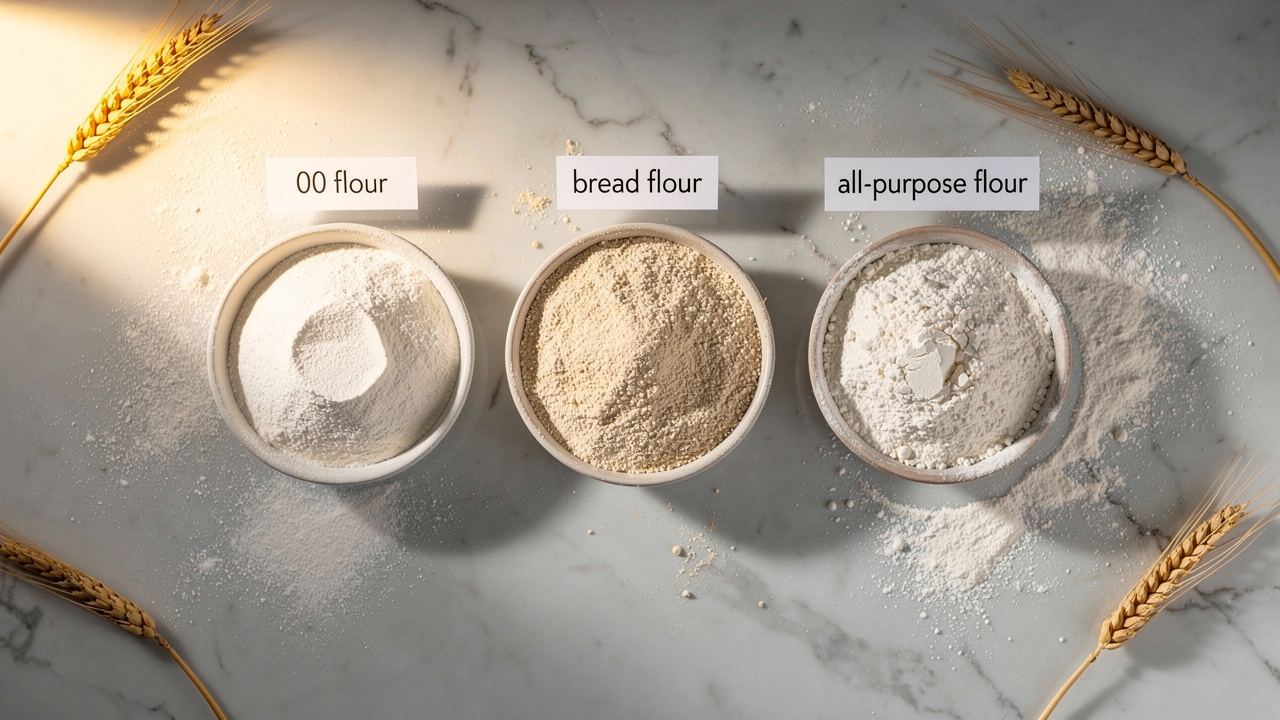
Flour: Bread flour (12–13% protein) is the right choice. The higher gluten content supports the 70% hydration without becoming a slack, unmanageable mess. All-purpose flour can work in a pinch, but the lower protein content means a weaker gluten network — you'll get a denser crumb that doesn't hold up as well under all that cheese. Some authentic recipes add 10–15% semolina for color and a slightly sandy texture; substitute 50–75g of the bread flour with fine semolina if you want to try it.
Cheese: The classic blend is Wisconsin brick cheese with white Cheddar, roughly 3:1 brick to Cheddar. Brick cheese is semi-soft, high-fat, with a mild buttery flavor that melts into a stretchy layer. White Cheddar adds sharpness and tang to balance the richness, and its higher fat content helps the edges caramelize harder against the hot pan.
Can't find Wisconsin brick cheese? Here are the best substitutes:
- Best substitute: Muenster + low-moisture mozzarella (50/50) — close in melt and fat content
- Good alternative: Monterey Jack + sharp white Cheddar (2:1) — mild and creamy with enough fat to caramelize
- Avoid: Fresh mozzarella (too much water), pre-shredded cheese (anti-caking agents kill caramelization)
Sauce: Detroit sauce goes on after baking as cold "racing stripes" — three thick stripes laid lengthwise down the finished pizza. The cold-on-hot contrast is intentional and non-negotiable for the authentic experience.
Simple Detroit sauce (enough for one 10×14 pizza):
- 1 can (400g) whole peeled San Marzano tomatoes, crushed by hand
- 2 cloves garlic, minced
- 1 tsp dried oregano
- 1 tsp sugar
- ½ tsp red pepper flakes
- Salt to taste
Simmer 15–20 minutes until slightly thickened. Cool completely before applying. The sauce should be served at room temperature or cold — not warm.
Detroit-style pizza dough formula
For a standard 10×14-inch pan (serves 6–8):
Total dough weight: ~888g
Why each ingredient matters:
- 70% hydration — high enough for an open, airy crumb; low enough to stay manageable without a mixer
- 0.5% yeast — slow enough for a 24–48 hour cold ferment without over-proofing; bump to 1% for same-day
- Sugar (optional) — feeds Maillard browning on the crust; skip if you prefer a plainer base
- Olive oil — coats gluten strands for a tender crumb; also acts as a barrier so the dough releases cleanly
For different pan sizes, use our pizza dough calculator with the Detroit preset — it scales everything automatically.
Learn more about how hydration affects crumb structure in our pizza dough hydration guide.
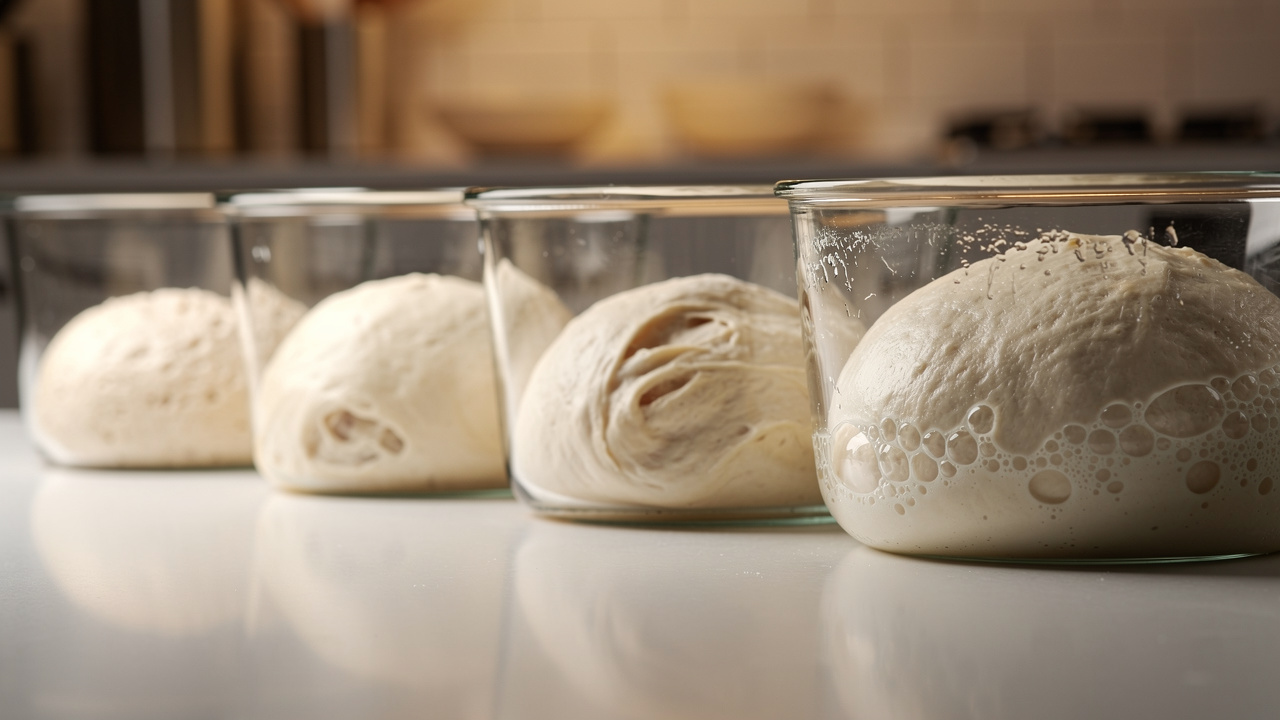
Fermentation timelines for Detroit pizza dough
Total time: 26–50 hours | Active time: ~30 minutes
Day 1 — Mix and bulk ferment:
Day 2 — Pan and final proof:
Total time: 6–7 hours | Active time: ~30 minutes
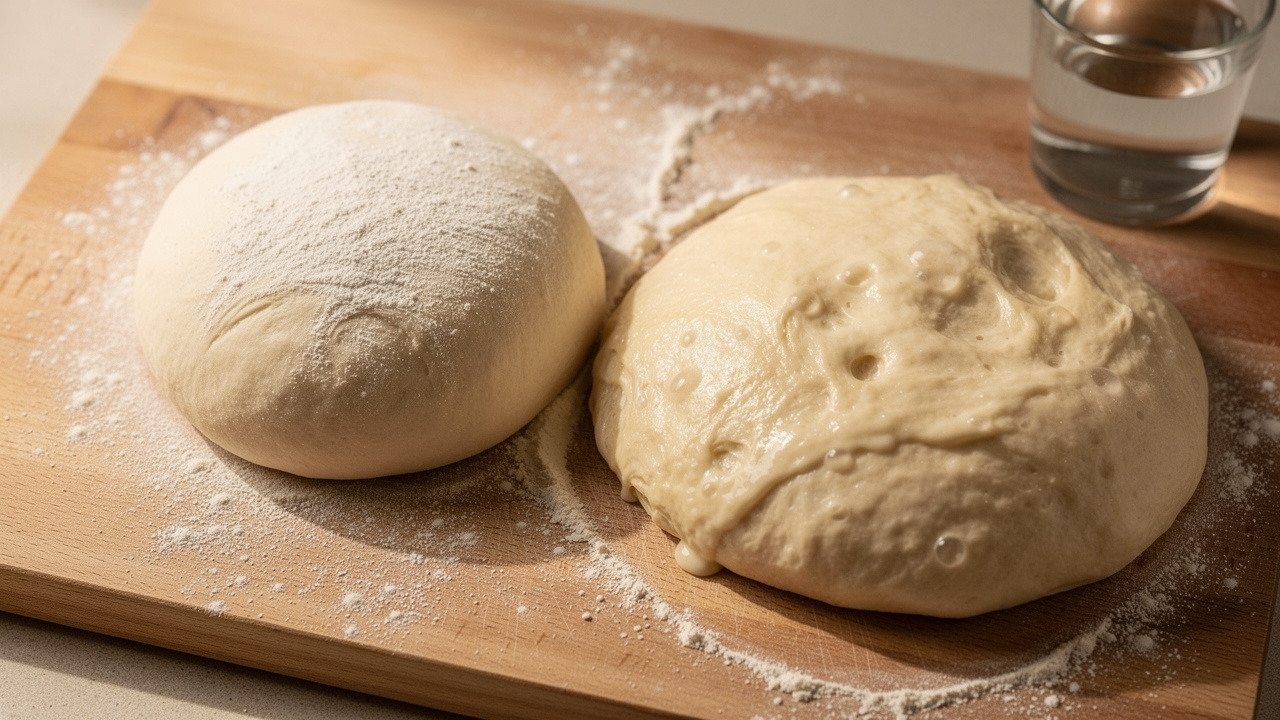
Use this when you don't have 24+ hours but still want a good result.
Modified formula: Use 5g instant yeast (1%) and warm water at 85–90°F (29–32°C) instead of cold. Everything else stays the same.
Note: Same-day dough produces a good pizza but the flavor is blunter — more neutral, less complex. The cold-fermented version develops organic acids during the long ferment that create depth you simply can't replicate with a quick rise. See our pizza dough fermentation guide for the science.
Cheese stacking technique
The cheese edge is what makes Detroit-style pizza what it is. Done right, you get the frico crust — a shatteringly crispy, caramelized cheese border that contrasts with the airy interior.
- Cut brick cheese and white Cheddar into ½-inch (1.5cm) cubes — don't shred. Cubes melt at a controlled rate and give you more control over how the cheese flows during baking.
- Use approximately 300–350g of total cheese for a 10×14-inch pan (roughly ¾ brick cheese, ¼ white Cheddar).
- Edge placement is everything: pile cheese extra high along the pan walls, pressing cubes firmly against the metal. The cheese at the edges should be roughly double the depth of cheese in the center. Push it into the corners — direct metal contact is what creates the frico.
- The center gets a thinner, more even layer.
- During baking, the edge cheese melts down the sides of the pan and fries against the hot metal. Watch for it: it should look like dark amber lace, not pale gold.
Tip: Cube your cheese the night before and refrigerate it uncovered. The slightly dried surface slows the initial melt, giving you more control over how it flows during baking — and a crisper final frico.
Two-phase bake
The two-phase bake solves the most common Detroit-style failure: a gummy, undercooked center under all that cheese.
Phase 1 — Prebake the dough:
Phase 2 — Add cheese and finish:
Warning: Skipping the prebake is the single most common Detroit-style mistake. The raw dough can't cook through under all that cheese without it. If your center is gummy, this is almost certainly why.
Baking tips
Temperature: Go hot. 500–550°F is the range — at lower temperatures, the bottom won't fry properly and the cheese won't caramelize the same way. If your home oven caps at 450°F, use the broiler for the final 2 minutes to drive the edge caramelization.
Rack position: Lowest rung, always. Maximum bottom heat.
Pan fat: Don't be shy. The butter + olive oil mixture fries the crust. If you didn't hear a sizzle when the dough went into the pan, add more fat.
Rest before cutting: Those 2–3 minutes aren't optional. The cheese and crust need to set for clean squares.
Internal temperature: The crust should reach 190–210°F (88–99°C) internally for proper doneness. An instant-read thermometer inserted through the side into the center crumb will tell you exactly where you are.
Troubleshooting
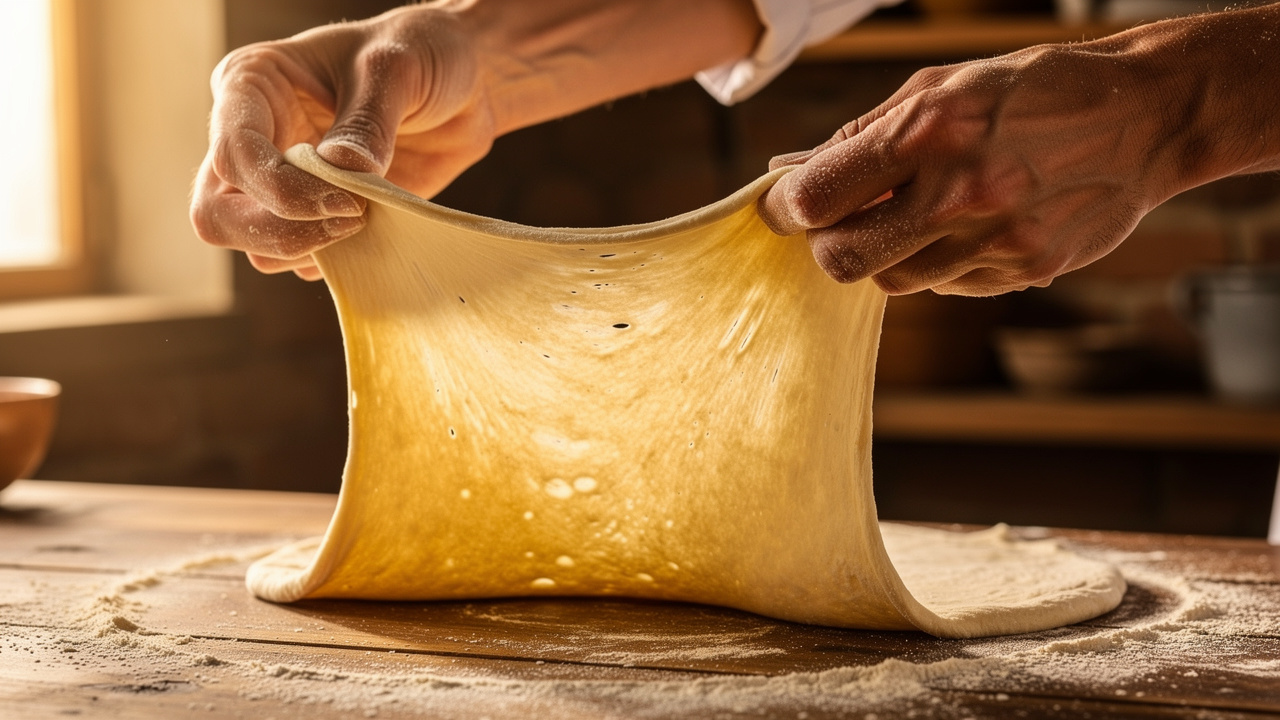
Dough won't stretch into the pan: The gluten is too tight — usually because the dough is too cold or hasn't relaxed enough. Stop, cover, and rest 15–20 minutes. It will cooperate.
Bottom isn't crispy: More fat in the pan, higher oven temperature, lower rack position. Also check: is your pan light-colored or non-stick? Switch to a dark steel or cast iron pan.
Cheese didn't caramelize: The cheese didn't reach the pan walls — it must make direct metal contact. Use cubed cheese, not shredded. Push it firmly against the sides and into the corners.
Center is gummy: You skipped or shortened the prebake. Bake the dough alone 5–6 minutes before adding cheese. No exceptions.
Crust is dense and bready: Check your fermentation — it may not have proofed long enough (look for 50–75% volume increase during bulk, a puffy/airy appearance during the pan proof). Also confirm you're at 70% hydration and using bread flour.
Frico crust is pale and soft: You need higher heat, more cheese pushed to the edges, and direct metal contact. Make sure the pan is preheated (or at least that the oven is fully preheated) and use a dark-colored pan.
Dough is too sticky to handle: At 70% hydration, some stickiness is normal. Wet your hands with cold water (not flour — flour changes the dough) when handling. A bench scraper helps enormously.
No frico forming: Stack more cheese along the edges — at least double the depth vs. the center. The cheese has to physically touch the pan walls the entire way up.
Make your Detroit-style pizza dough
Detroit-style pizza dough is straightforward once you understand the key moves:
- 70% hydration with bread flour for an airy, open crumb
- Cold ferment 24–48 hours for complex flavor (or same-day with doubled yeast)
- Butter + olive oil in the pan to fry the bottom crust
- Cubed brick cheese pressed to the edges for the signature frico
- Two-phase bake at 500–550°F — prebake first, then cheese
- Cold sauce stripes after baking — not before
The technique rewards patience more than skill. Get the fermentation right, don't skip the prebake, and push that cheese all the way to the metal walls. The pan does the rest.
Ready to dial in your Detroit-style pizza dough formula? Use our pizza dough calculator with the Detroit preset to scale for any pan size. For more on dough science, explore our complete pizza dough guide collection.
Frequently Asked Questions
Three things define Detroit-style: Wisconsin brick cheese cubed and pressed to the pan edges (creating a caramelized frico crust), cold sauce 'racing stripes' applied after baking, and a high-hydration dough (70%) baked in a blue steel pan. The industrial steel pan — originally auto factory parts trays — gives it a uniquely crispy, caramelized bottom that distinguishes it from Sicilian or grandma-style pan pizza.
Both are thick rectangular pan pizzas, but the differences are significant. Detroit uses higher hydration dough (70% vs 60-65% for Sicilian), cheese goes on first (under the sauce), and the cheese is pushed to the pan edges to create the frico crust — Sicilian puts sauce first. Detroit uses Wisconsin brick cheese; Sicilian typically uses mozzarella. The baking vessel also differs: blue steel pans for Detroit vs. olive-oil-coated sheet pans for Sicilian.
Wisconsin brick cheese is the traditional choice — a semi-soft, high-fat cheese with a mild buttery flavor that melts into a stretchy layer and caramelizes hard against the pan edges. Many recipes add white Cheddar (3:1 brick to Cheddar ratio) for sharpness. If you can't find brick cheese outside the Midwest, use a blend of low-moisture mozzarella, Muenster, and sharp white Cheddar in roughly equal parts. Avoid pre-shredded cheese — the anti-caking agents prevent proper caramelization.
The cold 'racing stripes' of sauce applied after baking are intentional — the contrast between hot cheese and cold sauce is part of the Detroit-style experience. Adding sauce before baking would create steam that softens the crust and prevents the cheese from caramelizing properly against the pan edges. The sauce also stays bright and fresh-tasting rather than cooked down.
Cube your cheese (don't shred — cubes melt differently and give better flow control), pile it extra high along the pan edges, pressing cubes firmly against the metal sides. The edge cheese should be roughly double the depth of cheese in the center. Use a dark steel or well-seasoned cast iron pan. The two-phase bake is also critical: prebake the dough 5–6 minutes before adding cheese, so the crust sets without becoming a steam trap.
Yes. For a same-day dough, increase yeast to 1% (5g for 500g flour) and use warm water (85–90°F / 29–32°C). Mix, bulk ferment at room temperature for 2 hours with 3 stretch-and-folds, then transfer directly to the greased pan. Let it proof 3–4 hours at room temperature until puffy and nearly doubled. The flavor won't be as complex as a 48-hour cold ferment, but it works well. For maximum flavor, cold ferment 24–48 hours.
A well-seasoned cast iron pan or dark anodized aluminum pan works. Avoid non-stick and glass — they won't caramelize the crust the same way. The traditional blue steel pans (LloydPans Detroit-style or the Detroit-Style Pizza Co. steel pans) are ideal because they conduct heat evenly, build a seasoned surface over time, and produce the characteristic rectangular shape and crispy caramelized bottom. A dark 9×13-inch metal baking pan is the most accessible substitute.
Yes. After the bulk ferment, portion the dough, wrap tightly in plastic, and freeze for up to 3 months. Thaw overnight in the refrigerator, then proceed with the pan proof. You can also freeze a pre-baked crust (after Phase 1 of the two-phase bake): cool completely, wrap, freeze. Reheat from frozen at 450°F for 8–10 minutes, then add cheese and finish.