New York Style Pizza Dough
Big, foldable slices with a crispy bottom and chewy bite. NY-style dough uses high-gluten flour, a touch of oil and sugar, and a 48-hour cold ferment for that classic slice-shop flavor.
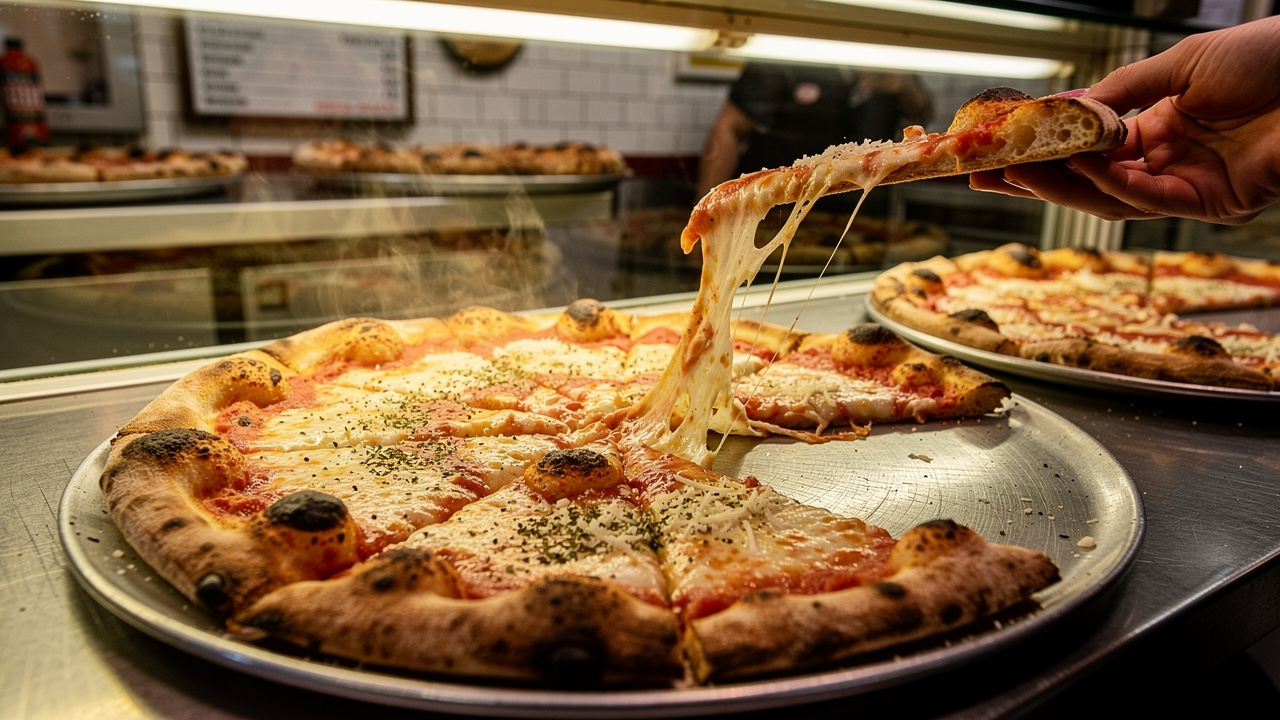
TL;DR: New York style pizza dough relies on high-gluten flour (13–14% protein), enriched with oil and sugar for flavor and browning. Cold ferment the dough for 48 hours for complex flavor, then hand-stretch thin for large, foldable slices with a crispy bottom and chewy bite.
What defines New York style pizza
New York style pizza is an American institution, born from Italian immigrants adapting Neapolitan pizza to American ingredients and tastes in the early 1900s. Gennaro Lombardi opened what's widely recognized as the first US pizzeria in 1905 — and the style that emerged from his shop and those of Totonno Pero, John's of Bleecker, and later Di Fara has stayed remarkably consistent ever since.
Unlike its delicate Neapolitan cousin, NY pizza dough is bold, substantial, and built to be eaten on the go — folded in half, grease dripping onto the sidewalk.
What makes it authentic:
- Large, wide slices from 18–20 inch pies
- Thin but sturdy crust that's crispy on the bottom yet chewy throughout
- Foldable structure that holds its shape when bent in half
- Slightly sweet, oil-enriched dough with a golden, blistered bottom
- Generous cheese coverage with a balanced sauce-to-cheese ratio
The coal ovens are rare now, replaced by deck ovens (Bakers Pride, Montague) running at 500–550°F. The dough formula and technique, though, haven't changed much.
NY Style Pizza Dough Ingredients
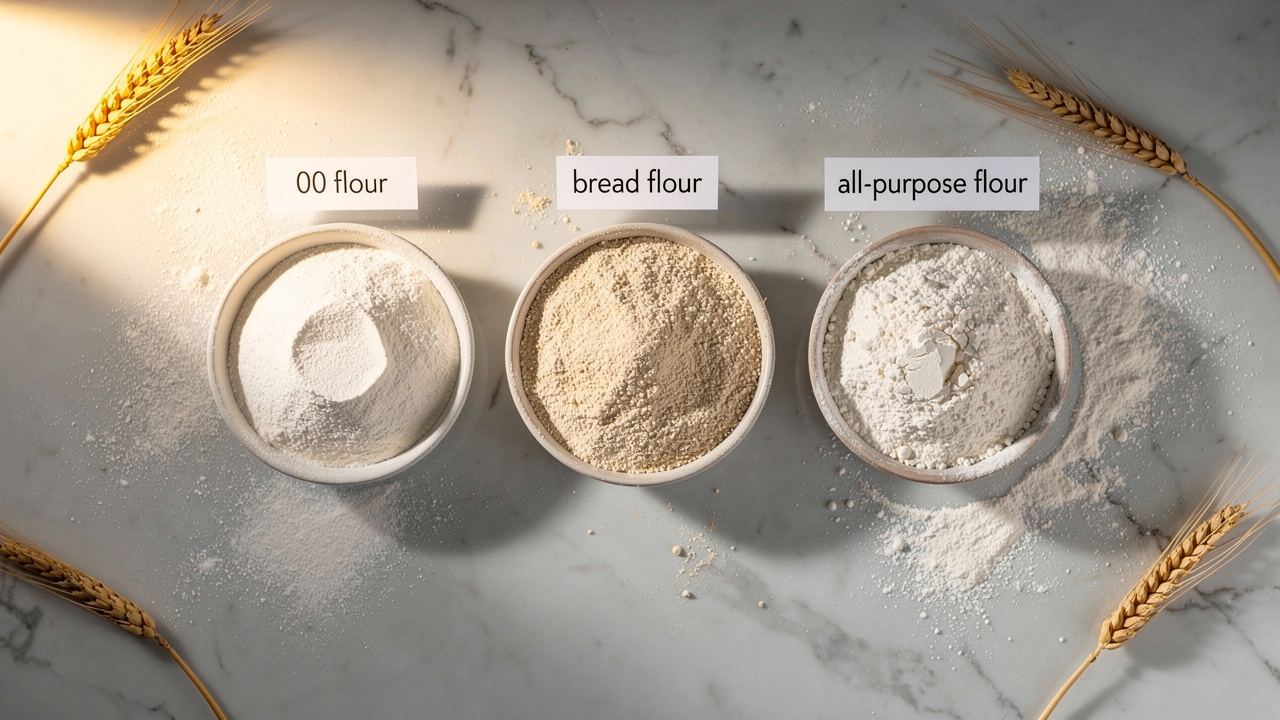
High-gluten flour
Unlike Neapolitan pizza's soft 00 flour, New York style demands true high-gluten flour in the 13–14% protein range, not just any "bread flour." This is the distinction most home recipes get wrong.
The professional standard for NYC pizza shops is All Trumps (General Mills) and Kyrol, both at 14.2% protein. For home bakers, King Arthur Sir Lancelot (14.2%) is the most accessible equivalent. Standard bread flour at 12–12.7% will give decent results but lacks the chewy pull and structural strength you need for large, foldable slices.
In Europe, look for "farine de gruau" (France), "harina de gran fuerza" (Spain), or "extra strong bread flour" (UK). If you can only find regular bread flour, add 1–2% vital wheat gluten to boost protein content — but sourcing the right flour is always the better path.
Note: Di Fara, one of New York's most revered pizza shops, uses a blend of Italian and American flour — a rare Neapolitan crossover move that most home bakers can ignore, but worth knowing.
Oil: the secret to flavor and texture
NY pizza dough includes 2–3% oil (typically olive oil or vegetable oil), which does several things at once:
- Tenderizes the dough without sacrificing chew
- Adds subtle flavor and richness
- Promotes browning for that golden-brown bottom
- Extends shelf life by slowing staling
- Improves extensibility for easier stretching
This is a major departure from traditional Neapolitan dough and a big part of what gives NY style its distinct character.
Sugar: browning and balance
Most NY pizza recipes include 1–2% sugar (granulated sugar or dextrose). Sugar contributes to browning through two distinct mechanisms: caramelization (direct sugar breakdown above 320°F/160°C) and by increasing the pool of reducing sugars available for the Maillard reaction — the amino acid–sugar interaction responsible for the complex browned flavor. At 1–2%, sugar's effect on fermentation rate is minor; its real job is the crust.
Diastatic malt: the pro's browning secret
Here's an ingredient most home recipes skip that professional pizzerias consider essential: diastatic malt powder at 0.5–1% baker's percentage (5–10g per kg of flour). Diastatic malt contains active amylase enzymes that break down starches into fermentable sugars during cold fermentation — producing two outcomes that matter:
- Rich, even golden-brown color — the signature NY slice browning that's hard to achieve with sugar alone
- Sustained yeast activity during long cold ferments, since the enzymes continuously supply fermentable sugars
Non-diastatic malt (barley malt syrup from the grocery store) adds color and flavor but lacks the enzymes — it's not a true substitute. Find diastatic malt powder online or at homebrew supply shops. A small bag lasts for years.
NY Style Pizza Dough Formula: Baker's Percentages
Here's the standard formula for authentic New York style pizza dough. Use the pizza dough calculator to scale it to any batch size with the "New York" preset.
| Ingredient | Baker's % | Weight (5 balls) |
|---|---|---|
| High-gluten flour (13–14% protein) | 100% | 1000g |
| Water | 60–65% | 600–650g |
| Salt | 2–2.5% | 20–25g |
| Instant dry yeast | 0.25–0.5% | 2.5–5g |
| Olive oil | 2–3% | 20–30g |
| Sugar | 1–2% | 10–20g |
| Diastatic malt powder | 0.5–1% | 5–10g |
Hydration: 60–63% is standard for a structured, easy-to-stretch dough. Higher hydration (63–65%) creates a slightly more open crumb and lighter texture; lower (58–60%) gives more structure and easier handling. See our pizza dough hydration guide for a deeper breakdown.
Dough ball weight by pizza size
| Dough ball weight | Pizza diameter | Notes |
|---|---|---|
| 200–230g | 10–12 inch | Personal |
| 280–300g | 14 inch | Standard home |
| 320–360g | 16 inch | Large |
| 400–450g | 18–20 inch | NYC pizzeria style |
How to Make New York Style Pizza Dough Step by Step
Consider a pre-ferment for better flavor
If you want to take your NY dough from good to outstanding, try a poolish instead of the straight dough method. A poolish is a pre-ferment: equal weights of flour and water mixed with a tiny amount of yeast (0.1%), fermented at room temperature for 8–16 hours before the final mix.
The night before: combine 30–40% of the total flour with the same weight of water and a pinch of yeast. Let it ferment until bubbly and slightly domed. The next day, add it to the remaining ingredients and mix as normal. The result is a noticeably more complex flavor and a slightly more open crumb — complexity that cold fermentation alone can't fully replicate.
See our poolish vs. biga guide for a full breakdown of both approaches.
Mixing method
- Combine flour, salt, sugar, diastatic malt, and yeast in the bowl (keep salt and yeast from direct contact initially).
- Add water and oil with the dough hook on low.
- Mix 1–2 minutes until a shaggy mass forms, then increase to medium-low.
- Knead 5–7 minutes until smooth and elastic.
- Check the windowpane test: stretch a small piece thin — it should be translucent without tearing.
- Target a final dough temperature of 75–78°F (24–26°C). If your kitchen runs hot, use cooler water.
::tab{title="By Hand"}
- Combine dry ingredients in a large bowl.
- Add water and oil; mix until a shaggy mass forms (2–3 minutes).
- Turn onto a lightly floured surface. Knead 12–15 minutes using the heel-press-fold-rotate method.
- The dough is ready when it's smooth, slightly tacky (not sticky), and passes the windowpane test.
- Check the final dough temperature: 75–78°F (24–26°C).
:::
::tab{title="Food Processor"}
- Add dry ingredients to the food processor and pulse to combine.
- Use cold or ice water — the processor generates friction heat. Your water should be around 40°F (4°C).
- With the machine running, pour in water and oil through the feed tube.
- Process 30–45 seconds until the dough comes together into a ball.
- Remove and knead by hand for 1–2 minutes to smooth the surface, then check for the windowpane.
- The food processor method is fast but can slightly over-develop gluten if run too long — stop at 45 seconds maximum.
:::
:::
The dough should feel smooth, slightly tacky but not sticky. It will be noticeably firmer than Neapolitan dough due to the higher protein content and lower hydration.
Bulk fermentation
After mixing, place the dough in a lightly oiled container. Two approaches:
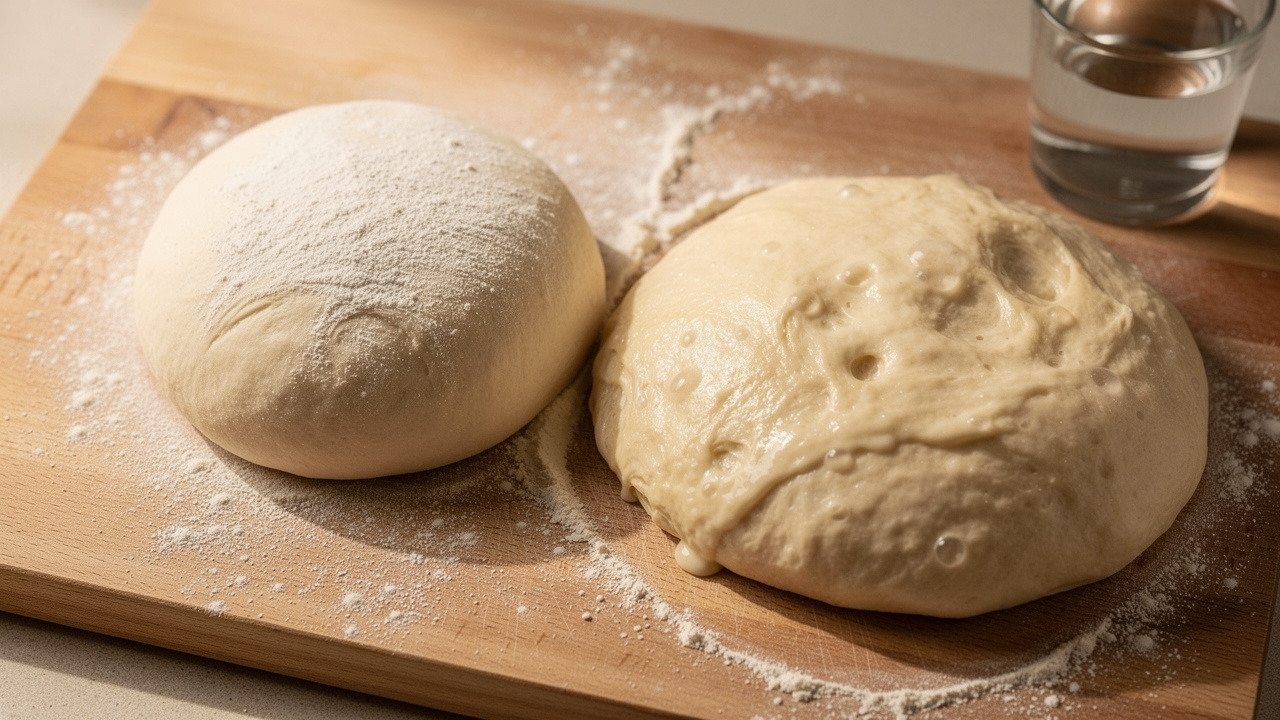
Short bulk (recommended for cold ferment): Let the dough rest 30–60 minutes at room temperature — just enough for the gluten to relax. Then ball immediately and move to the fridge. This is the standard approach for a 48-hour cold ferment.
Skip entirely: Some bakers ball immediately after mixing with no bulk rest. Fine for doughs going straight to the fridge for 48+ hours — the extended cold ferment handles all the development.
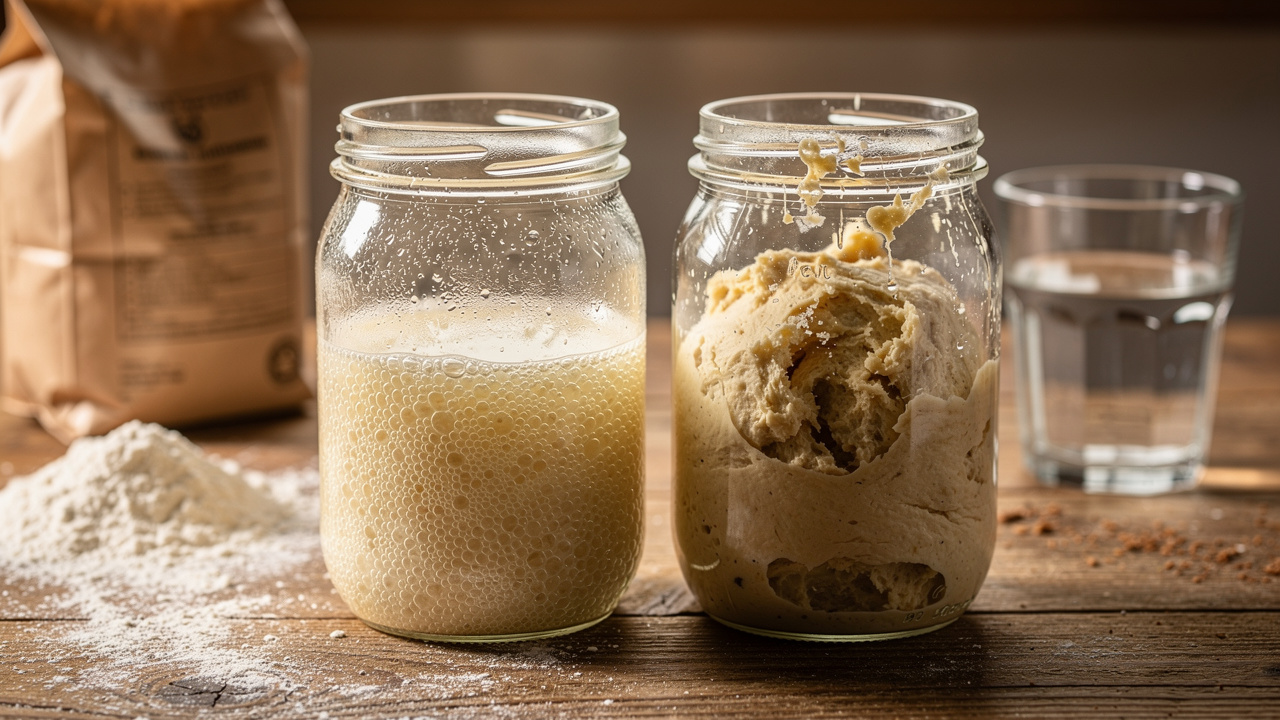
Cold Fermentation: The NY Pizza Secret
Cold fermentation isn't optional for proper New York style pizza. A minimum of 24 hours in the fridge, with 48 hours being the real sweet spot. Same-day dough will give you pizza, but not *New York* pizza. The slow, cold ferment develops lactic and acetic acids, ethanol, and flavor esters that simply don't form fast enough at room temperature.
Benefits of cold fermentation
- Complex flavor: Slow fermentation builds deep flavors with a subtle tang
- Better texture: Extended enzyme activity breaks down starches and proteins, making the dough more extensible and easier to stretch
- Better browning: More amino acids and sugars available for browning reactions
- Convenience: Make dough days in advance and use when ready
The cold fermentation process
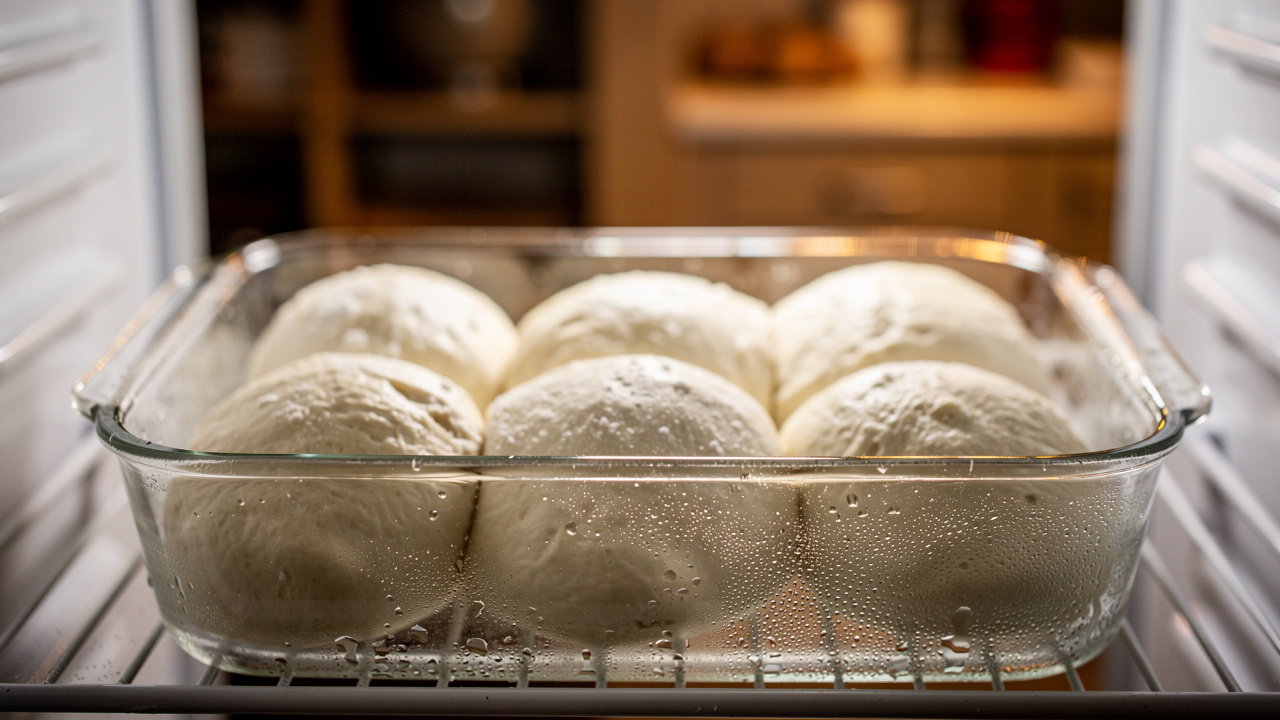
- Ball the dough: Divide into portions based on your target pizza size (see table above). Shape into tight balls by pulling the surface toward the bottom and pinching to seal.
- Oil the balls: Coat each ball lightly with oil to prevent drying and skin formation.
- Container choice: Individual deli containers work best. Alternatively, space balls on an oiled sheet pan covered tightly with plastic.
- Refrigerate at 38–40°F (3–4°C):
- 24 hours: Minimum for noticeable improvement
- 48 hours: The sweet spot — excellent flavor and texture
- 72+ hours: Maximum flavor complexity, but watch for over-fermentation signs (dough collapses, smells very sour)
- Bring to temperature before stretching: Remove from the refrigerator 2–3 hours before use. Use a probe thermometer and target 60–65°F (15–18°C) at the center of the dough ball. Below 60°F, the gluten is too rigid and the dough will tear. Above 70°F, it gets slack and hard to handle.
Yeast adjustment for cold fermentation
For cold fermentation, use less yeast than same-day recipes:
- 24–48 hour cold ferment: 0.25–0.3% instant yeast (2.5–3g per kg flour)
- 48–72 hour cold ferment: 0.15–0.2% instant yeast (1.5–2g per kg flour)
Using too much yeast causes over-fermentation — overly sour, weak dough that tears easily.
Tip: If your dough over-ferments and collapses in the fridge, reduce the yeast by half next time and make sure the dough goes in cool (not warm from a long bulk ferment). Full fermentation timing breakdown in our fermentation guide.
Same-day method (when you can't wait)
Cold fermentation is ideal, but if you need pizza today, here's how to get respectable results:
Same-day pizza is genuinely good. It just won't have the depth you get from 48 hours in the cold.
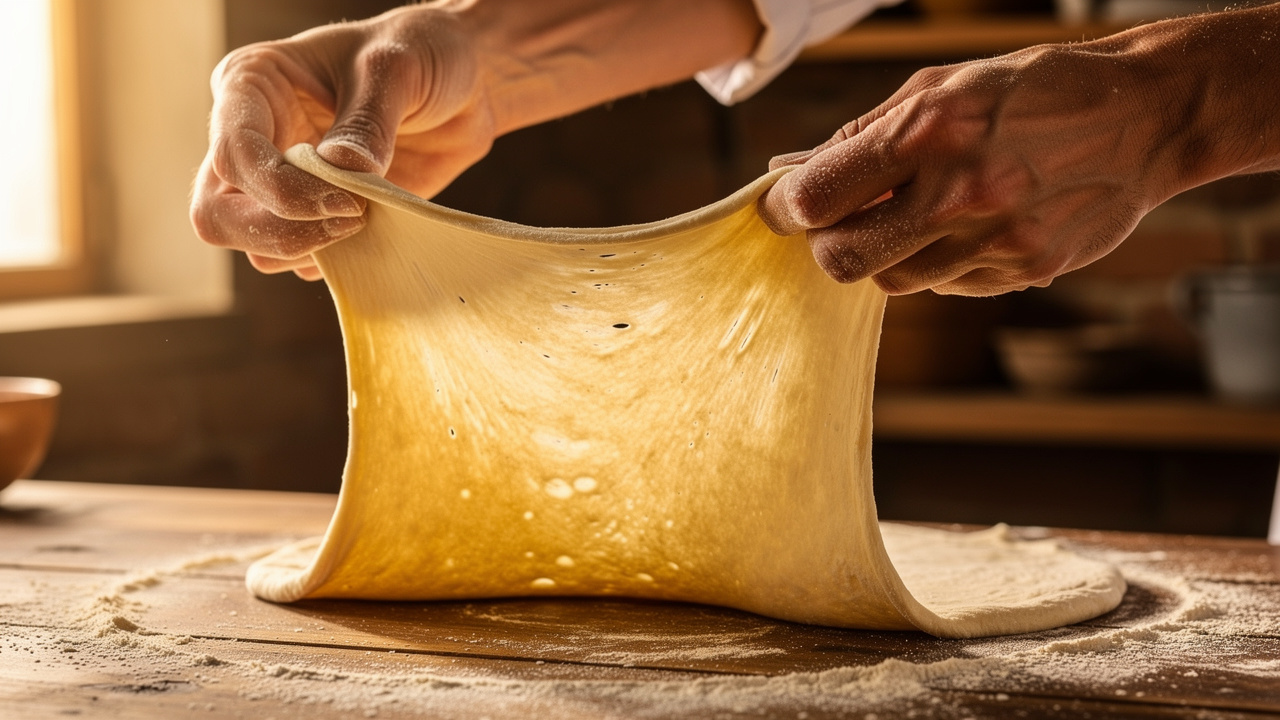
Stretching and Shaping NY Style Pizza
NY pizza is stretched by hand, never with a rolling pin. Rolling deflates the gas bubbles and produces a dense, cracker-like crust with none of the chew.
The dough should stretch with minimal resistance if properly fermented and at 60–65°F. If it springs back or tears:
- Springs back: Too cold or under-fermented. Rest 15 minutes and try again.
- Tears in the center: Either too cold, or the dough was over-stretched too fast. Let it warm and work more slowly.
The fold test: Great NY pizza should fold in half lengthwise without breaking or drooping excessively. If yours fails, increase flour protein or reduce hydration slightly.
Baking: Getting That Perfect NY Crust
Traditional NY pizza is baked in gas deck ovens at 500–550°F (260–290°C) for 7–10 minutes. The moderate heat (compared to Neapolitan's extreme temperatures) allows even cooking, crispy bottoms, and fully melted cheese without burning.
Home oven method
Note: NY pizza sauce is no-cook: crushed San Marzano tomatoes (or good domestic canned tomatoes), salt, dried oregano, and a splash of olive oil. No simmering. The cheese is always low-moisture, whole-milk mozzarella — shredded from a block, not pre-shredded (which contains anti-caking agents that inhibit melting).
The two-stone baking method
For the closest home replication of a commercial deck oven:
Place one steel or stone on an upper rack and another on a lower rack, about 8 inches apart. Preheat both at maximum temperature for a full hour.
- Launch onto the top stone/steel and bake ~6 minutes. The radiant heat from above browns the cheese while the stone crisps the bottom.
- Rotate 180 degrees for even color.
- Transfer to the bottom stone/steel for 4–5 more minutes to finish crisping the underside.
The top stone radiates heat down onto the cheese while the bottom stone delivers direct contact heat to the crust — mimicking the top-and-bottom heat of a commercial deck oven.
Single surface alternative: Place the steel on the lowest rack. Bake 5–6 minutes until the bottom is deeply golden, then slide the pizza to the top rack directly under the broiler for 2–3 minutes to finish the top. Watch closely — the broiler can go from perfect to burnt in 30 seconds.
Storing and Freezing NY Style Pizza Dough
NY pizza dough stores and freezes well, which makes large batches practical.
Refrigerator: After balling, dough keeps well in the fridge for up to 5 days. Flavor improves through day 3; beyond that, the risk of over-fermentation increases (watch for dough that collapses or smells sharply sour).
Freezer (up to 3 months):
Frozen-thawed dough performs identically to fresh cold-fermented dough. The freeze-thaw cycle doesn't noticeably affect flavor or texture.
Troubleshooting NY Style Pizza Dough
| Problem | Likely cause | Fix |
|---|---|---|
| Dough springs back, won't stretch | Too cold or under-fermented | Rest 15 min longer; check dough temp is 60–65°F |
| Dough tears in center | Over-stretched, or too cold | Let warm up, work more slowly outward from center |
| Bottom doesn't crisp | Steel/stone not hot enough, or toppings too wet | Preheat 1 hour; reduce sauce; lighter toppings |
| Dough collapses in fridge | Over-fermented | Reduce yeast by 30–50%; refrigerate dough sooner |
| Crust too dense | Rolling pin used, or not enough cold ferment | Hand-stretch only; cold ferment at least 24h |
| Cheese browning before bottom cooks | Rack position too high | Move steel to upper-middle; add bottom stone |
| Dough very sticky | Hydration too high, or flour protein too low | Reduce water by 10–20g; use higher-protein flour |
For a deep dive into every common failure mode, see our pizza dough troubleshooting guide.
Home Oven Tips for NY Style Pizza
Use a pizza steel. Steel has significantly higher thermal conductivity than ceramic stone, which means more heat transfer to the crust bottom in less contact time. For NY-style pizza at home oven temperatures, steel makes a meaningful difference.
The fold test. Great NY pizza should fold in half lengthwise without breaking. If yours droops immediately or tears, the crust is either too thin at the rim or the dough lacks enough protein.
Scale up your batches. Make 8–10 dough balls at once, cold ferment for 48 hours, then freeze whatever you don't use that week (see above). Large batches amortize the effort.
Experiment with oil. Olive oil is traditional, but many NYC shops use vegetable oil or a blend. Each gives slightly different flavor and browning. Corn oil in particular promotes browning slightly more than olive oil due to its higher smoke point.
Don't rush the room temperature rest. Cold dough straight from the fridge needs 2–3 hours to reach 60–65°F. Rushing this is the single most common cause of torn dough.
Want a sourdough version? It's possible to adapt this formula using a sourdough starter instead of commercial yeast — the flavor becomes more complex and slightly tangier. See our sourdough pizza dough guide for the full process.
The NY Style Pizza Dough Philosophy
New York style pizza is adaptation and evolution. Italian immigrants took Neapolitan traditions and reworked them for American ingredients, ovens, and eating habits — and what emerged is pizza that's less delicate than Neapolitan, but just as good in its own bold, satisfying way.
The one change that matters most for your NY style pizza dough at home: get a pizza steel, cold ferment for 48 hours, and stretch thinner than you think you should. A thin center with a puffy edge is the whole game. If the bottom isn't almost burnt, your oven wasn't hot enough.
Ready to explore more styles? Browse all our pizza dough guides or use the pizza dough calculator to dial in your next batch.
Frequently Asked Questions
True high-gluten flour with 13–14% protein is what NYC pizza shops use. The professional standard is All Trumps (General Mills) or Kyrol, both at 14.2% protein. For home bakers, King Arthur Sir Lancelot (14.2%) is the most accessible equivalent. Standard bread flour at 12–12.7% works but won't have the same chew. If you can only find regular bread flour, add 1–2% vital wheat gluten to bump the protein content.
Minimum 24 hours, with 48 hours being the real sweet spot. Same-day dough will give you pizza but not New York pizza — the slow cold ferment is where the flavor and texture develop. You can push to 72 hours for maximum complexity, but risk over-fermentation beyond that. Use 0.25–0.3% instant yeast for 48-hour ferments.
Oil (2–3%) tenderizes the dough, adds flavor, promotes browning, and improves stretchability. Sugar (1–2%) contributes to browning through both caramelization and by boosting the Maillard reaction between amino acids and sugars — two distinct mechanisms. Both are key departures from Neapolitan dough and define the NY style character.
NYC tap water is soft (around 60 ppm mineral content), which may mildly affect gluten development and fermentation. The practical reality is that blind taste tests — including Kenji López-Alt's — found minimal detectable difference. The flour protein content and cold fermentation time matter far more. If your tap water is very hard (above 200 ppm), filtering it is worth trying, but it's not a meaningful variable for most bakers.
Use a pizza steel (significantly better heat retention than stone), preheated for at least 45–60 minutes at maximum oven temperature. Stretch the dough thin in the center, don't overload with wet toppings, and dust your peel with a 3:1 flour-to-semolina blend. For even better results, use the two-stone method: bake on the top stone first, then transfer to the bottom stone to finish crisping.
Yes — NY dough freezes well. Ball the dough first, coat each ball lightly in oil, wrap individually in plastic wrap, and freeze. Use within 3 months for best results. To thaw, move to the refrigerator 24 hours before use, then let it come to 60–65°F (15–18°C) at room temperature for 2–3 hours before stretching. Thawed dough behaves identically to fresh cold-fermented dough.
About 1/8 inch (3mm) in the center with a slightly thicker edge — around 1/4 inch. NY pizza should fold in half lengthwise without breaking or drooping excessively (the 'fold test'). If yours fails, increase flour protein or reduce hydration slightly. Stretch by hand only — never use a rolling pin, which deflates the dough and creates a dense crust.