Roman pizza al taglio
Rome's iconic sheet pizza, sold by weight and eaten standing up. An ultra-light, airy crumb with a crispy bottom, made with poolish and ~80% hydration over 2-3 days.
TL;DR: Pizza al taglio is Rome's iconic sheet pizza, made with a poolish pre-ferment and ~80% hydration dough. A 2-3 day process (poolish overnight, mix and cold ferment, then bake in an oiled pan at 475-500°F) produces an ultra-light, airy crumb with a crispy bottom. Keep toppings simple and light — the crust is the star.
What is pizza al taglio?
Pizza al taglio (literally "pizza by the cut") is Rome's street-style pizza sold by weight in rectangular slices. Unlike Neapolitan pizza, which is round and cooked quickly at extreme heat, pizza al taglio is baked in large rectangular pans and cut to order — customers point, the slice is weighed, then folded in half for eating on the go.
The style became widespread in Rome from the 1950s onward, as bakeries began adapting their dough-baking operations to meet demand from a fast-growing city. Early versions were dense and heavy. The transformation came with Gabriele Bonci, who opened Pizzarium in Rome's Prati neighborhood in 2003. Bonci applied the principles of artisan bread baking — stone-milled heritage flours, long fermentation, seasonal toppings — to al taglio, turning a humble street food into a culinary reference. His work at Pizzarium, and later his appearance on Netflix's *Chef's Table: Pizza*, brought the style to international attention and set the technical standard that most serious recipes follow today.
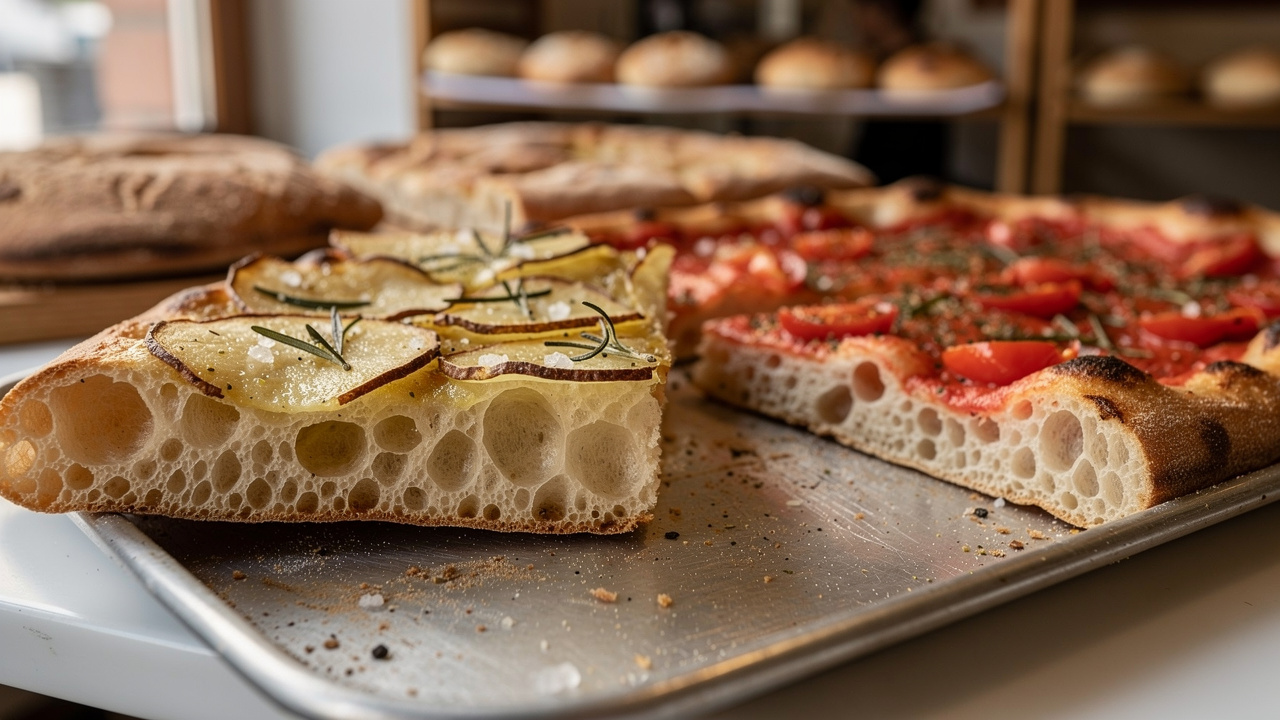
The high hydration dough and 2-3 day fermentation process create a focaccia-like texture that's incredibly light and digestible. It's easy to tell real al taglio from an imposter: the crumb should have large, irregular air pockets visible from the cut edge, and the bottom should audibly crunch when you break the slice.
Pizza al taglio vs. pizza in teglia
These two terms are often confused. Pizza in teglia (pizza in the tray) describes the *baking method* — cooked in a rectangular metal pan. Pizza al taglio describes the *selling method* — cut to order and sold by weight. Most Roman al taglio is baked in teglia, so the terms overlap heavily in practice. If someone says pizza in teglia, they're talking about the pan. If they say pizza al taglio, they're talking about how it's sold.
Al taglio vs. focaccia
A frequent question is whether pizza al taglio is just thick focaccia. The answer is no. Both use high hydration and olive oil, but al taglio dough ferments significantly longer (48-72 hours vs a few hours for most focaccia), uses a stronger flour with more protein, and is baked at a higher temperature. The result has a more open, irregular crumb, a thinner, crispier bottom, and less of the oily chew associated with focaccia.
Pizza al taglio is also part of a broader family of Roman pizza styles: pizza in pala (baked on a long wooden paddle, slightly thinner and more oval) and pizza al metro (pizza by the meter, served on elongated boards). All share high hydration and extended fermentation, but differ in shaping and presentation.
The poolish pre-ferment
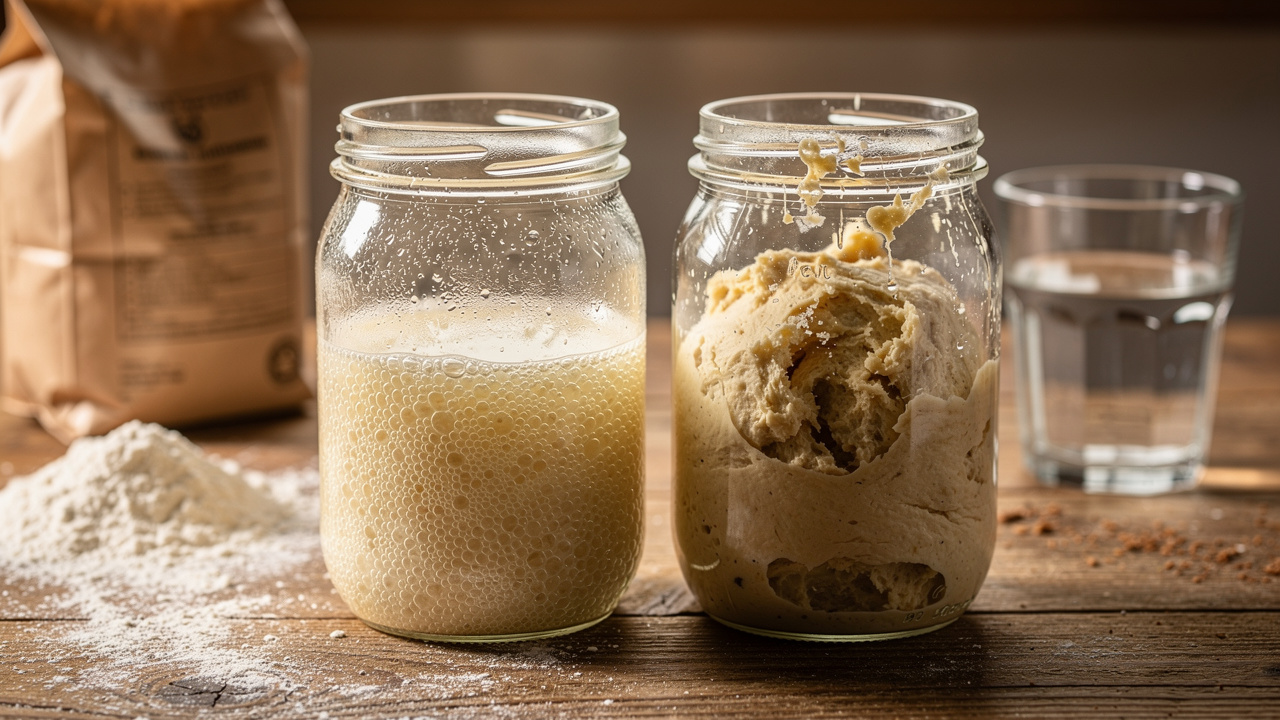
The secret to al taglio's incredible lightness is the poolish pre-ferment. A poolish is a 100% hydration mixture of flour, water, and a tiny amount of yeast that ferments for 12-16 hours before being incorporated into the final dough.
Why so little yeast (0.5g for 200g flour)? The small inoculation slows fermentation deliberately, allowing enzymatic activity and acid development to proceed over the full window without the poolish over-ripening before you're ready to mix. A poolish that goes too long — past its dome peak into a collapsed, flat state — has exhausted its food supply and will produce a slack, over-acidic dough.
What poolish gives you:
- Complex, slightly sweet flavor from slow fermentation
- A more extensible gluten network that holds the extra water
- Better gas retention for the open, irregular crumb
- Improved digestibility through partial starch breakdown
- Longer shelf life from the organic acids produced
Poolish readiness signs: At peak, the poolish will have a domed surface with abundant small bubbles, smell mildly yeasty and slightly sweet, and show a slight webbing if you tilt the container. If the center has collapsed flat and the smell is sharp or vinegary, it's over-fermented — reduce the yeast amount next time or ferment in a cooler spot.
The poolish typically makes up 30-50% of the total flour in the recipe, with the remaining flour and water added during final mixing.
Sourdough variation
If you bake with sourdough, you can substitute starter for the commercial yeast poolish. Use 15–20% active starter by total flour weight (75–100g for a 500g batch). Build a levain with equal parts starter, flour, and water and ferment until doubled, about 4–6 hours at 24°C.
The rest of the process stays the same, with timing adjustments: extend bulk fermentation to 5–7 hours at room temperature with coil folds, then cold-retard 24–48 hours. On baking day, allow a longer final proof — up to 4 hours. The crumb structure is identical to the commercial yeast version; the flavor has more complexity and a subtle tang. Many Roman bakers consider this approach even truer to traditional fermentation practice.
Pizza al taglio dough formula (baker's percentages)
Total time: 2-3 days. For a standard half-sheet pan (13×18 inches / 33×46 cm). Use our pizza dough calculator to scale this formula to any pan size.
Poolish (12-16 hours before final mix):
| Ingredient | Weight |
|---|---|
| Bread flour | 200g |
| Water | 200g |
| Instant yeast | 0.5g |
Mix until no dry flour remains. Cover and ferment at room temperature (18-22°C) until domed and bubbly, 12-16 hours.
Final Dough:
| Ingredient | Baker's % | Weight |
|---|---|---|
| Bread flour | 60% | 300g |
| Water | 40% | 200g |
| Poolish | — | 400g |
| Salt | 2.5% | 12.5g |
| Extra virgin olive oil | 3% | 15g |
Total hydration: ~80% | Total dough weight: ~930g
Note: The 80% hydration creates an extremely wet, sticky dough that requires proper technique — not more flour. Wet hands, slap-and-fold, and patience are the tools.
Scaling the formula by pan size
Scale by surface area, not guesswork. Aim for 3.8–4.5g of dough per square inch depending on how thick you want the final slice.
| Pan Size | Approx. Total Dough | Notes |
|---|---|---|
| 9×13 in / 23×33 cm (quarter sheet) | 500–620g | Best for first attempts |
| 13×18 in / 33×46 cm (half sheet) | 900–1,050g | Standard home batch |
| 18×26 in / 46×66 cm (full sheet) | 1,800–2,100g | Events or large service |
Keep salt and oil percentages fixed (2.5% and 3% of total flour) while scaling everything else proportionally.
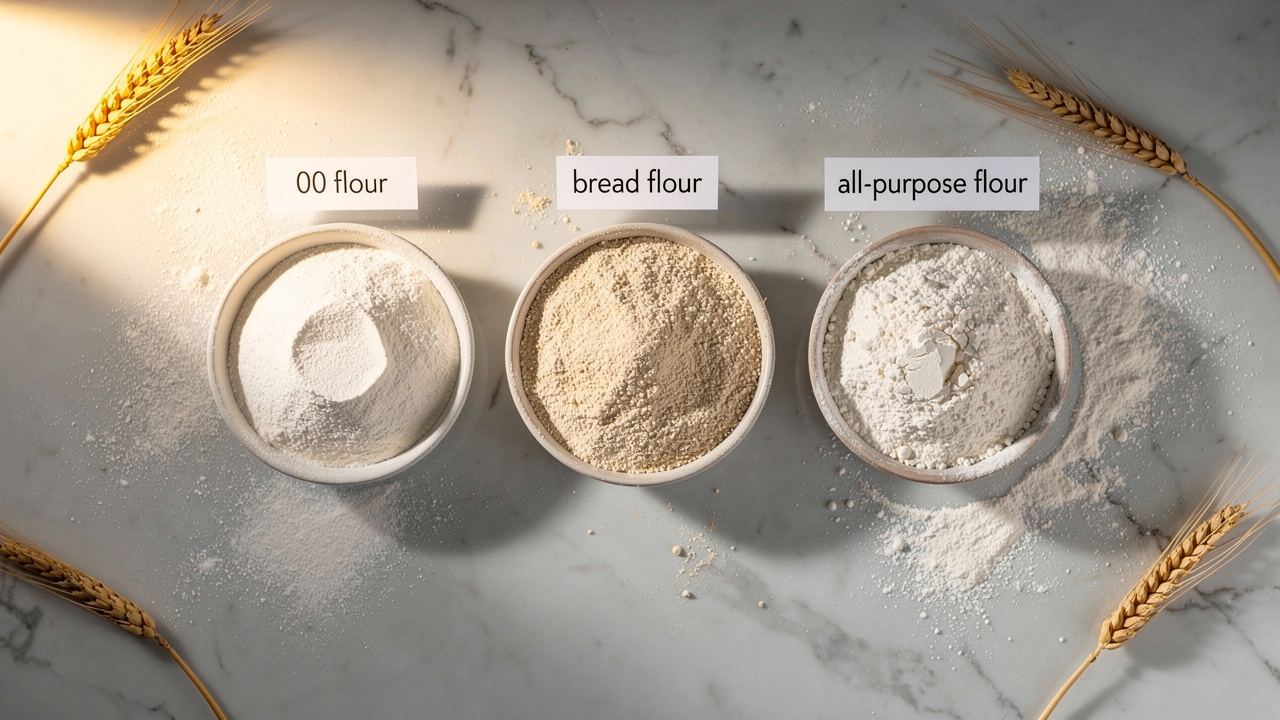
Best flour for pizza al taglio
Use strong bread flour at 12–13% protein, roughly equivalent to a W 300–350 in the Italian classification system. This gives the gluten network enough strength to hold 80% hydration without collapsing during fermentation.
You can blend in 10–30% Tipo 00 flour for slightly more extensibility and a silkier crumb texture, but avoid weak all-purpose flour (10–11% protein) — the gluten network won't support the hydration.
Recommended flours by market:
- US: King Arthur Bread Flour (12.7% protein) is widely available and performs well. Bob's Red Mill Artisan Bread Flour is a solid alternative.
- Italy/EU: Caputo Manitoba Oro, Petra 9 (Molino Quaglia), Agugiaro 5 Stagioni Super are the standard choices for professional and home bakers.
- UK: Shipton Mill Strong White Bread Flour, Matthews Cotswold Strong.
For the flour link, see the pizza flour guide for a full comparison of Italian flour grades, protein content, and W-values.
Romana dough: a distinct tradition
Roman-style dough is fundamentally different from Neapolitan dough — it is not simply Neapolitan with more water. The flour choices, fermentation schedules, and handling techniques are distinct traditions that produce a completely different eating experience.
Where Neapolitan dough typically uses finely milled 00 flour at 55-65% hydration with a same-day or overnight fermentation, Romana dough calls for stronger flour at 75-85% hydration with a multi-day process. The higher protein content is non-negotiable — the gluten network needs to be robust enough to hold the extra water without collapsing.
The pre-ferment is also essential rather than optional in Roman dough. A Neapolitan pizzaiolo may produce an excellent pizza with a direct dough; in al taglio, skipping the poolish or biga produces something closer to thick focaccia. The long poolish (12-16 hours) followed by cold bulk fermentation (24-48 hours) is what creates the signature honeycomb crumb and the remarkable lightness despite the thick cross-section. Respect the process and it rewards you.
Equipment: choosing the right pan
The pan you use directly affects the bottom crust. There are three practical options:
Blue carbon steel (traditional)
The pan used in Roman pizzerias — typically a 60×40 cm steel tray. Steel retains heat better than aluminum and produces an exceptional, evenly browned bottom. It requires initial seasoning (coat with oil and bake empty at high heat 3-4 times) and should never be washed with soap. Over time a seasoned steel pan becomes essentially nonstick and produces progressively better results.
Hard-anodized aluminum (best for home use)
The most practical option for home bakers. No seasoning required, widely available in half-sheet size, and the dark surface promotes faster browning than light aluminum. A quality hard-anodized pan (Nordic Ware, USA Pan) will produce results very close to a seasoned steel pan.
Standard aluminum sheet pan
Works, but the lighter color reflects heat rather than absorbing it, resulting in slower and less even browning. Compensate by using the lower rack position and placing a baking steel on the rack below to deliver radiant heat from underneath.
Avoid nonstick pans — the high temperatures needed to properly fry the bottom (475–500°F) can damage most nonstick coatings.
High-hydration handling techniques
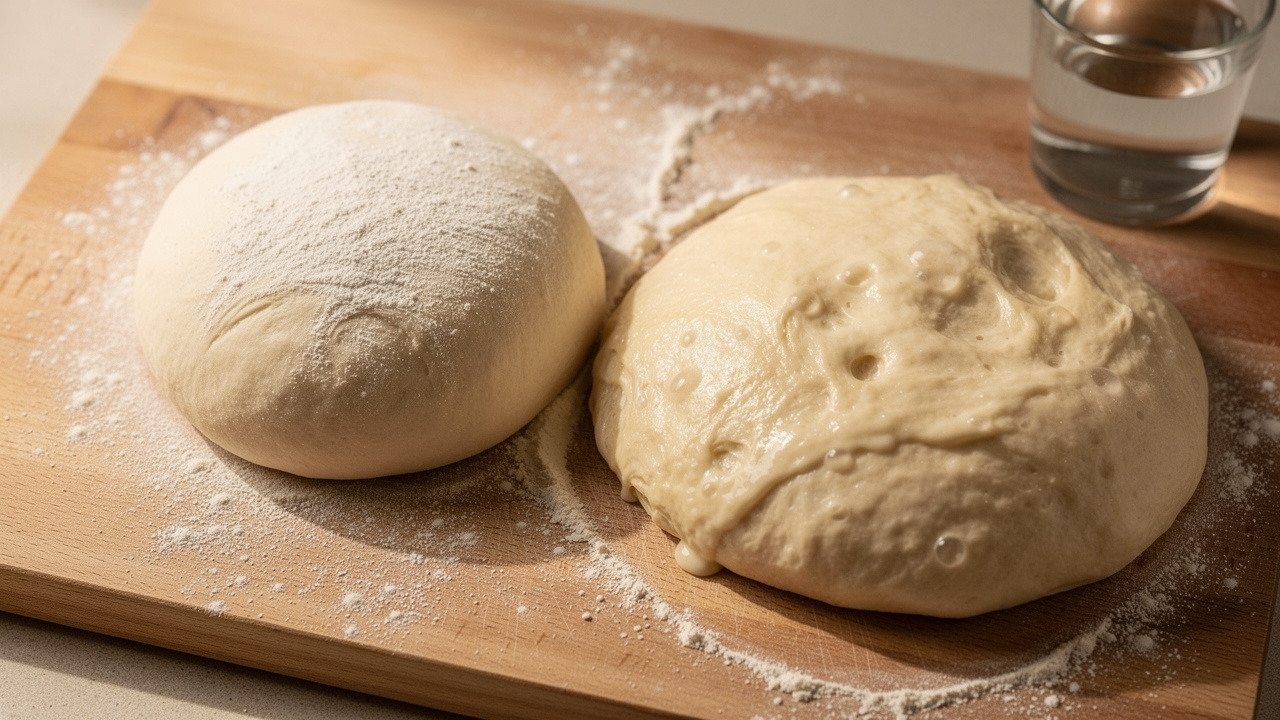
Working with 80% hydration dough is different from traditional pizza dough. The dough will feel uncomfortably wet at first — that's correct.
Slap and fold (bassinage)
Instead of traditional kneading, use the slap-and-fold technique. Wet your hands, lift the dough, slap it onto the counter, then fold it over itself. Repeat for 5-7 minutes until the dough smooths out and passes the windowpane test.
For an even better result, use bassinage: add 80% of the final water when mixing, develop the gluten for 3-4 minutes with slap-and-fold, then drizzle in the remaining 20% of water slowly while continuing to fold. This incremental addition lets the flour fully absorb each addition before taking on more water, reducing the risk of the dough turning soupy.
Note: The windowpane test at 80% hydration looks different from lower-hydration doughs. The membrane will be thicker and less transparent — aim for a translucent patch that doesn't tear immediately when stretched, not the paper-thin window of a Neapolitan dough.
Wet hands, not floured
Keep your hands wet with water or a thin film of olive oil when handling the dough. Flour will dry the surface and disrupt the hydration balance. This feels strange at first but becomes intuitive quickly.
Coil folds during bulk
Perform 3-4 sets of coil folds during the first 2 hours of bulk fermentation, roughly every 45 minutes. Wet your hands, slide them under the dough from both sides, lift the center, and let the ends fold under. Rotate 90° and repeat. This builds structure without degassing the fermentation bubbles you're trying to preserve.
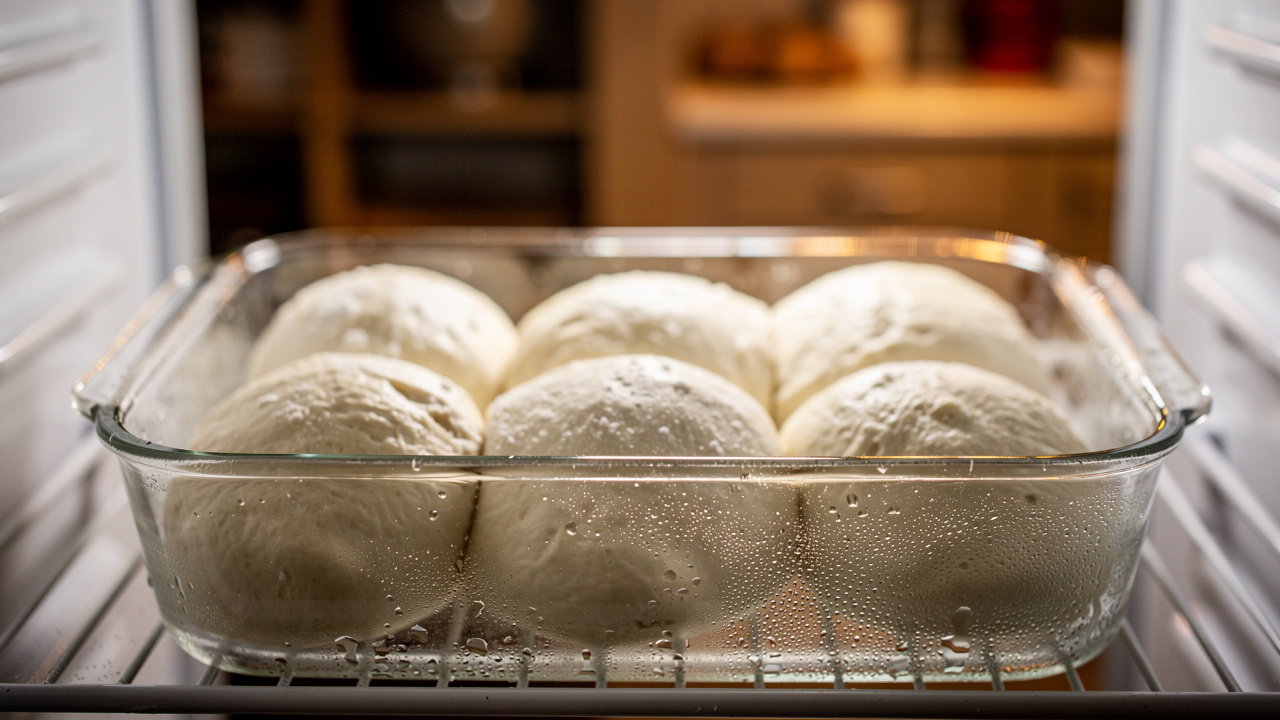
Cold fermentation
A 24-48 hour cold fermentation (4-5°C / 39-41°F) dramatically improves both flavor and handling. Cold dough is far easier to stretch into the pan than room-temperature dough — the gluten tightens and the dough becomes much more manageable.
Tip: If you're new to high-hydration dough, start at 75% hydration and work your way up. Even a few percentage points make a noticeable difference in handling, and a slightly lower hydration still produces an excellent result.
Step-by-step process and fermentation timeline
Total time: 2-3 days. The active hands-on work is about 45 minutes total — the rest is fermentation.
Day 1 — Evening (6–8 PM):
Day 2 — Morning (8–10 AM):
Day 3 or 4 — Baking Day:
Shaping and panning
Gentle handling during panning preserves the airy structure built up over 2-3 days of fermentation.
- Oil the pan generously — the olive oil is what fries the bottom and creates the crispy crust
- Pour the dough into the center rather than placing it aggressively
- Use oiled fingertips to press outward from the center
- If dough springs back persistently, cover and rest 15–20 minutes before continuing — never force it
- Final dough should fill the pan with roughly even thickness
Dimpling before toppings: Press oiled fingertips all over the surface to create the characteristic dimples. This prevents large air bubbles forming under toppings during baking and gives the finished pizza its distinctive texture.
Docking for a crispier result: For a flatter, crispier base — especially under heavier toppings like potato or thick tomato sauce — use a fork or docking tool to poke small holes across the surface after dimpling. This releases trapped air and prevents excessive puffing. Skip docking for lighter toppings or if you prefer a thicker, more pillowy result. Many professional Roman bakers use docking selectively across the same sheet, creating textural contrast between zones.
Toppings for pizza al taglio
Traditional Roman toppings are simple and seasonal — the crust is the main event, not a vehicle for elaborate combinations.
Classic Combinations:
- Patate: Thinly sliced potato, rosemary, olive oil, sea salt
- Zucchine: Zucchini rounds or ribbons, mozzarella, black pepper
- Margherita al Taglio: San Marzano tomatoes, fior di latte, basil, olive oil
- Mortadella e Pistacchio: Added after baking — mortadella, crushed pistachios, burrata
- Fiori di Zucca: Zucchini blossoms, mozzarella, anchovies (optional)
The Sectional Approach:
One of the great pleasures of pizza al taglio is sectioning a single sheet with different toppings — creating multiple flavors from one bake. Mark off zones mentally or with a light line of sauce, top each zone independently, then cut along zone lines when serving. This makes al taglio ideal for dinner parties or gatherings where variety matters without the work of multiple pizzas.
Topping Guidelines:
- Less is more — heavy toppings weigh down the delicate crumb
- For wet toppings (tomato sauce, fresh mozzarella), add sparingly or at the halfway point of baking
- Fresh ingredients — burrata, prosciutto, arugula — go on after baking
- Cheese should be torn or shredded, not sliced thick
Topping moisture control
Most "good dough, soggy slice" failures come from water-heavy toppings applied incorrectly. The fix:
Best post-bake additions: burrata, prosciutto, mortadella, fresh herbs, dressed greens.
Baking temperature and technique
Professional Roman deck ovens run at 680–750°F (360–400°C) — far hotter than any home oven can reach. Most home ovens top out around 500–550°F (260–290°C). The gap is real, but workable.
Home oven setup
- Preheat to 475–500°F (245–260°C) for at least 45 minutes
- Use middle or upper-middle rack position for the pizza pan
- Place a baking steel or stone on the rack below — the radiant heat from underneath significantly improves bottom browning and mimics the deck oven effect
Standard baking process
Two-part baking for home ovens
For thick dough or wet toppings, a two-stage approach prevents soggy centers:
This allows moisture to escape from the dough before toppings seal it in. Many professional Roman bakers use a version of this method — baking base sheets in advance and finishing to order throughout the day.
Reheating: Reheat at 400°F (205°C) on a wire rack for 5–7 minutes, or use a cast iron skillet over medium-high heat: place the slice in the dry skillet, cover with a lid for 3–4 minutes to heat through, then remove the lid for 1–2 minutes to re-crisp the bottom.
The science behind the airy crumb
Several factors work together to produce the signature open, irregular crumb of pizza al taglio.
High hydration (80%)
More water means more steam during baking. Steam generates rapid expansion inside the dough — the same gas bubbles that formed during fermentation expand dramatically in the hot oven before the crust sets. You can observe this directly: a properly hydrated al taglio will visibly puff and rise during the first 5 minutes of baking, often doubling in height before the crust firms up.
Poolish pre-ferment
The long fermentation produces organic acids and proteolytic enzymes that partially degrade gluten bonds. This makes the gluten network *extensible* rather than *elastic* — it stretches easily under the pressure of expanding gas without springing back and tearing. The result is large, irregular bubbles rather than the tight, uniform crumb of a yeasted bread mixed and baked the same day.
Gentle handling during shaping
Every degas during shaping destroys bubbles built during fermentation. Pouring the dough into the pan rather than throwing it, using fingertips rather than palms, and resting rather than forcing are all techniques to preserve the gas structure accumulated over 2-3 days.
Final proof at room temperature
The 2-3 hour room temperature proof after cold fermentation lets the yeast reactivate from near-dormancy and generate a final flush of CO₂ gas. The dough transitions from dense and cold to visibly puffy and light. If you skip this proof, the oven spring is much weaker and the crumb will be denser.
Steam and oven spring
The high water content delays crust formation, allowing the expanding gas maximum time to push the dough upward before the exterior sets. This is why the two-part baking method works so well — it lets the steam escape from the raw dough surface before toppings trap it, ensuring the oven spring happens cleanly.
Troubleshooting pizza al taglio
Dough is too sticky to handle:
This is normal and expected. Use wet hands and work quickly. If it's truly unmanageable, you may have added too much water — reduce by 10–20g next time. Also check that your cold fermentation was long enough: fresh dough from a 24-hour cold retard handles noticeably better than dough fermented at room temperature.
Dough tears when stretching:
Let it rest longer. Cold dough straight from the refrigerator needs 30–60 minutes to warm and relax. If it still tears after resting, your flour may be too weak — switch to a higher-protein bread flour.
Dense crumb instead of airy:
Likely causes: insufficient fermentation time, overworking the dough during shaping, or not enough final proof before baking. The poolish may also have been under-fermented (not bubbly enough) or over-fermented (collapsed and acidic). For more common issues, see our pizza dough troubleshooting guide.
Bottom is pale and soft:
Use more oil in the pan, bake at a higher temperature, or move to a lower oven rack. A baking steel below the pan helps significantly. Also check that you're removing the pizza from the pan immediately after baking — leaving it in the pan traps steam and softens the bottom.
Toppings sink into dough:
Add toppings just before baking (not during the final proof) and keep them light. Pre-cook vegetables to reduce their moisture and weight.
Storage, freezing, and reheating
Baked pizza keeps for 2–3 days. Store loosely covered at room temperature for same-day slices; refrigerate for longer. Freeze individual slices tightly wrapped in plastic for up to 1 month.
Reheating baked pizza:
- *Oven method:* Place on a wire rack (not a solid sheet pan) at 400°F (205°C) for 5–7 minutes. The rack allows air circulation under the slice and keeps the bottom crispy.
- *Skillet method:* Place the slice in a dry cast-iron or stainless skillet over medium-high heat. Cover with a lid for 3–4 minutes to heat through, then uncover for 1–2 minutes to re-crisp the bottom. Fastest and best results for a single slice.
Freezing the dough:
Freeze after bulk fermentation, before panning. Wrap the dough ball tightly in oiled plastic wrap, then place in a sealed freezer bag. Use within 1 month. To thaw: transfer to the refrigerator overnight (8–12 hours), then rest at room temperature for 2–3 hours before panning. Treat like cold-retarded dough from this point forward.
Make your Roman pizza al taglio
Pizza al taglio rewards patience. The 2-3 day process — poolish overnight, mix and bulk ferment, cold retard, then bake in an oiled pan — produces a crumb that's nothing like what you get from a same-day dough. The open, irregular holes, the crispy oil-fried bottom, the lightness despite the thick cross-section: that's what makes al taglio worth the wait.
Start with the formula above and adjust from there. If 80% hydration feels unmanageable, drop to 75% for your first batch — you'll still get excellent results. The poolish and cold fermentation do the heavy lifting on flavor regardless of hydration level.
Ready to calculate your own batch? Use Fond's pizza dough calculator to scale the formula to any pan size, or explore our other pizza dough guides for more styles and techniques.
Frequently Asked Questions
Pizza al taglio (literally 'pizza by the cut') is Rome's iconic rectangular sheet pizza, sold by weight and cut to order. Unlike Neapolitan pizza (round, baked quickly at extreme heat), al taglio is baked in large pans at moderate temperatures, producing an ultra-light, airy crumb with a crispy bottom. It uses a poolish pre-ferment and ~80% hydration, creating a focaccia-like texture that's incredibly light and digestible.
Poolish (a 100% hydration pre-ferment of flour, water, and a tiny amount of yeast) is essential for al taglio's signature lightness. The 12–16 hour fermentation develops complex flavor, builds a more extensible gluten network that supports high hydration, creates better gas retention for the open crumb, and improves digestibility. Skipping the poolish and using a direct method will give you focaccia, not true pizza al taglio.
~80% total hydration is standard for pizza al taglio — significantly higher than most pizza styles. This extremely wet dough requires confident handling: wet hands (not floured), slap-and-fold instead of kneading, and coil folds during bulk fermentation. If you're new to high-hydration dough, start at 75% and work up. Even a few percentage points lower still produces excellent results.
Keep your hands wet with water or oil — never use flour, which disrupts the hydration balance. Use the slap-and-fold method instead of traditional kneading. When transferring to the pan, pour and coax the dough rather than aggressively stretching. If it springs back, cover and rest 15–20 minutes before continuing. The dough becomes much more cooperative after cold fermentation.
Yes. Preheat to 475–500°F (245–260°C). Use a half-sheet pan generously oiled — the oil fries the bottom and creates the crispy base. For the best bottom crust, place a baking steel or stone on the rack below your pan. A two-part baking approach helps: prebake the crust without toppings for 10–12 minutes, then add toppings and finish for another 10–12 minutes. This prevents soggy centers from wet toppings.
Use strong bread flour around 12–13% protein (roughly W 300–350). It gives the dough enough structure for 75–85% hydration and long fermentation without collapsing. You can blend in 10–30% 00 flour for slightly easier stretching, but avoid weak all-purpose flour if you want a true al taglio crumb. In the US, King Arthur Bread Flour works well; in Italy, Caputo Manitoba or Petra 9 are go-to options.
Yes. Use 15–20% active starter by total flour weight (75–100g for a 500g batch). Because sourdough ferments more slowly, extend the bulk fermentation to 5–7 hours at room temperature, then cold-retard 24–48 hours. The resulting crumb has more complex, slightly tangy flavor with the same open structure. Expect longer proof times on baking day — up to 4 hours instead of 2–3.
Blue carbon steel pans are the traditional Roman choice — they retain heat well and produce an excellent crispy bottom after seasoning. For home use, a dark hard-anodized aluminum pan is the most practical option and doesn't require seasoning. Standard light-colored aluminum sheet pans work but produce slower, less even browning. Avoid nonstick pans — they can't handle the high heat needed to fry the bottom properly.